Last year, my eldest daughter requested a Minecraft cake, and I made one by covering a butter cake with a mosiac of Minecraft-style tiles made from sugar cubes (coloured with different types of cordial syrup). It looked amazing, but was a lot of work. So, this year, when she asked for a Minecraft cake again, I wanted to do something a little less complicated.
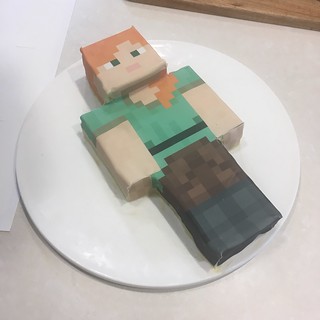
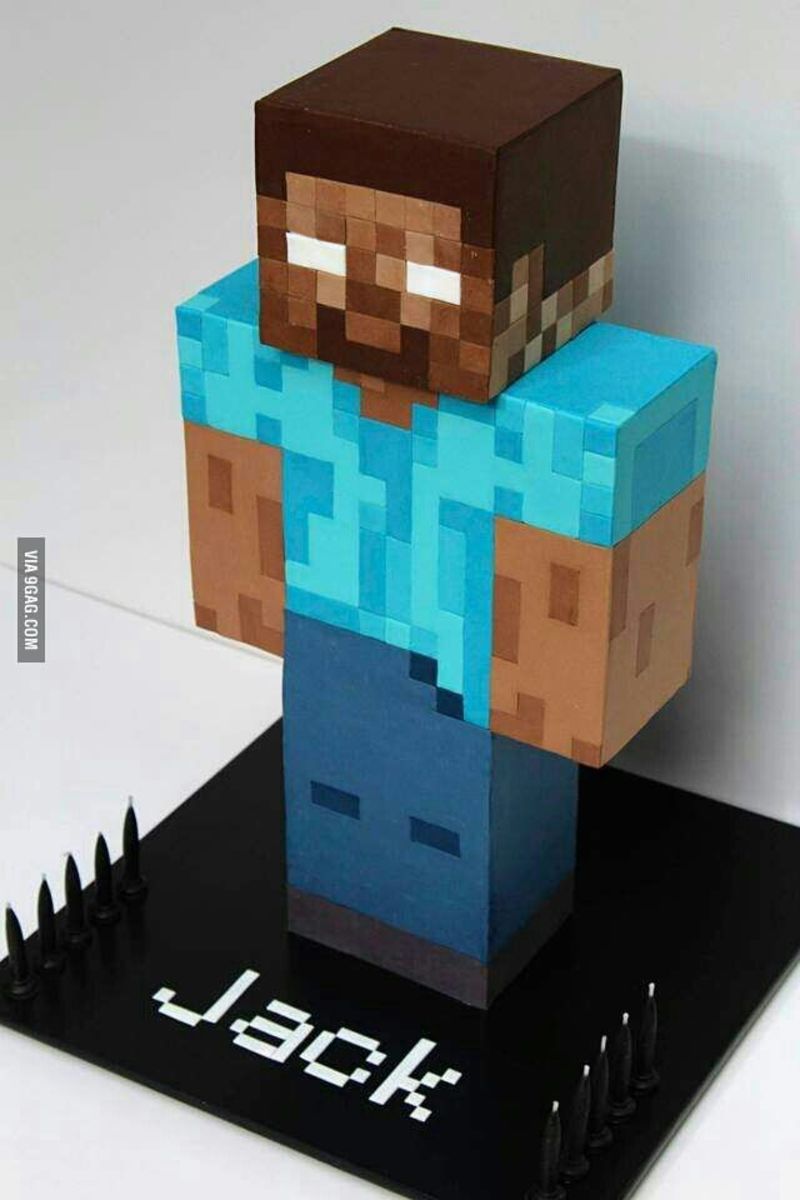
The spec was a girl Minecraft character, lying down, made out of chocolate cake (inspired by this cake). As you can see, it looked just like the character Alex, and was almost all gone by the end of the party, so was pretty tasty, too. It was a chocolate butter cake, filled with chocolate butter cream, and coated with white chocolate ganache. If you want to do something similar, here’s what I did.
Ingredients 1 (chocolate butter cake)
- 190g unsalted butter
- 1/2 teaspoon vanilla extract
- 1 cup caster sugar
- 3 eggs
- 2 1/4 cups of self-raising flour (minus 2 tablespoons)
- 2 tablespoons cocoa powder
- 1/2 cup milk
Method 1 (chocolate butter cake)
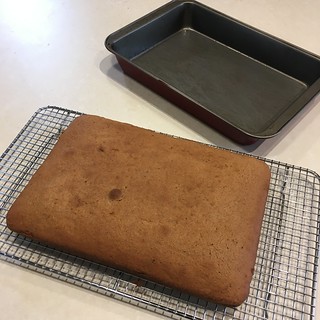
- This is based on the butter cake recipe from The Women’s Weekly Children’s Birthday Cake book. Firstly, get the oven warming at 190 degrees Celcius.
- Grease and line a large tin, 30cm x 21cm x 5cm. You can probably use something narrower if you need to, but the length is important.
- Bring butter to room-temperature if it isn’t already. I usually place it on a plate in about 1cm thick slices and zap in the microwave for 30s at 50% power.
- Place butter and vanilla in a mixer, and beat until light and creamy. Add sugar gradually while beaters are running at slow to combine. Add eggs one by one and give it a good beat after each to ensure it comes together.
- Remove bowl from the mixer, and sift in half the flour. Add half the milk and return to the mixer until combined. Then do the same thing again with the rest of the flour and milk, except this time include the cocoa powder with the sifted flour.
- You should have a thick mixture that can be dollopped into the greased tin. Smooth the top to ensure it’s level.
- Bake in the oven for 25-30 minutes or until a skewer comes out clean.
- Cool for a couple of minutes in the tin, then remove and and cool on a wire rack overnight. This will ensure cake is completely cool and can be most easily cut to shape the cake design.
Ingredients 2 (white chocolate ganache)
- 1 cup (250 mL) thickened cream (35% fat)
- 660g of white chocolate melts
Method 2 (white chocolate ganache)
- Place the chocolate melts into a metal (or glass) bowl, and place on the stove over a saucepan with a little bit of water. (Note, if you want to make milk or dark chocolate ganache, you need to use a ratio of closer to 2g:1mL.)
- Pour the cream into a small saucepan, and heat on the stove until it is simmering temperature.
- Remove the small saucepan from the stove, and pour the cream into the chocolate. Stir until the mixture is smooth.
- Remove from the stove, allow to cool for a couple of minutes, and then put in the fridge for a couple of hours to stiffen. Note that this will (most likely!) make more ganache than you need, but it’s better to err on the safe side.
Ingredients 3 (chocolate butter cream)
- 125g unsalted butter
- 1 1/2 cups icing sugar (minus 1 heaped tablespoon)
- 1 heaped tablespoon of drinking chocolate
- 2 tablespoons milk
Method 3 (chocolate butter cream)
- This is also from The Women’s Weekly Children’s Birthday Cake book. Firstly, ensure the butter is at room temperature, e.g. using the technique above. This time, also ensure the milk is at room temperature.
- Put the butter in the bowl of a mixer and beat until it is as white as possible.
- Sift the icing sugar and drinking chocolate into another bowl, and gradually add about half of it into the butter with the mixer running.
- Add the milk gradually, then gradually add in the remaining sifted icing sugar.
Method 4 (constructing the cake)
- Days earlier, I had created a design for an icing sheet that would be used to decorate the exterior of the cake. This was based on the Alex design at Pixel PaperCraft.
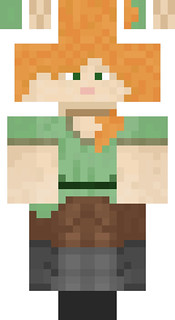
- I uploaded this to an icing sheet printing service – in this case, I used CustomIcing.com.au – and had them print it onto an A3 sheet. I got it in the post a couple of days later, and kept it in a cold place until I needed it.
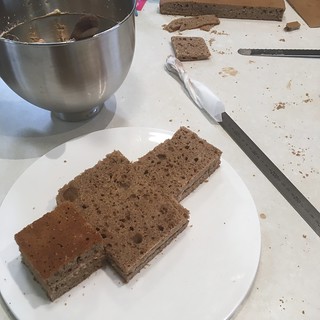
- I cut the cooled cake into three pieces. Two were 7cm x 7cm x 2.5cm squares that would be used for the head. The other was a T-shaped piece that was 21cm long, and 14cm wide at its widest point, but 7cm wide at its narrowest. This was actually a mistake, and it should have been more like 12.5cm wide at its widest point (the arms are 3 blocks wide each not 4 blocks). In any case, the exact measurements will depend on the icing sheet, so take measurements from that, and allow at least 0.5cm for icing.
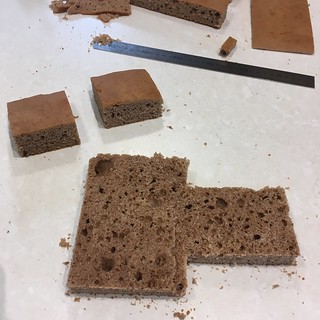
- Next, slice the T-shaped piece in half horizontally, so that it can be filled with the butter cream.
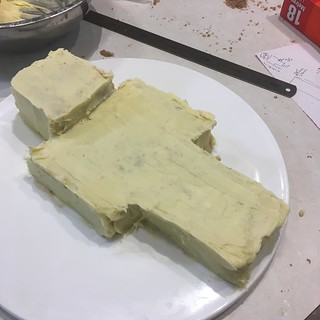
- Spread butter cream between the two square pieces and sandwich together. Place onto the plate or platter that will be used to present the cake. Also, spread butter cream into the T-shaped piece. Join with the square piece to make the shape of a block person (note the square piece is taller than the rest of the cake). If there isn’t enough butter cream coming right to the edge, pipe butter cream along the gap.
- Remove the ganache from the fridge and use a palette knife to spread a decent coating over the cake. It’s okay if it gets crumbs in it or looks a bit rough at this point.
- Place the cake in the fridge for the ganache to firm up again, and in the mean-time prepare the icing sheet.
- Cut along the outside of each of the shapes on the icing sheet using a sharp knife and a ruler. Also, cut along the base of the arm a little, so the hands are not connected to the legs.
- Remove the cake from the fridge. Using a jug of hot water and a tea towel, keep the palette knife hot (but dry) and shape the ganache so that it is smooth, level and has distinct corners. Also, use a ruler to ensure that the ganache-covered cake matches the measurements of the design on the icing sheet. You may want to trim off some of the cake, reapply ganache, refrigerate again and smooth the ganache before going on.
- Gently pick up the design from the icing sheet, peeling it away from the backing material. Slowly lower it onto the cake, possibly using a second person at this point! It is probably best to start with the legs and then lower the head piece on last. It is very easy to rip the icing sheet.
- Carefully smooth the icing sheet onto the ganache, and then return to the fridge until it is needed.
- Eat it! It was devoured quickly by a dozen kids and a couple of nearby adults.

