Making a VRM avatar from Ready Player Me

When I went looking to create an avatar, I discovered that there were a lot of options. There are 2D avatars that look like animated illustrations and 3D avatars that look like video game characters. There are full-body avatars, and half-body avatars (the top half, if you’re wondering). There are avatars tied to a particular app or service, and avatars that use an interoperable standard. There are many standards.

I decided that I wanted a full-body 3D avatar, since this seems to be the way things are headed. If I was using a Windows PC, I would be able to use something like Animaze and have my avatar track to my gestures and expressions. However, I am currently using a Mac and there are fewer options, especially in English. I was able to find the browser-based FaceVTuber service and the application 3tene, though. 3tene requires avatars in the VRM standard, so that made my decision for me.

The easiest way to create a VRM avatar seems to be to use VRoid Studio application, although the resulting avatars look like anime characters. I wanted to create a more realistic looking 3D avatar, and a service like ReadyPlayer.Me would be perfect, as it quickly creates an avatar based on a photo. The catch is that ReadyPlayer.Me does not yet export a VRM file version of their avatars. But there is a way to do it, if you’re willing to jump through some hoops.

This is a guide that I’ve put together based on trial and error, and heavily inspired by ReadyPlayer.Me’s instructions on exporting to a GLB file for Unity and Mada Craiz’s video on converting a ReadyPlayer.Me GLB file into a VRM file.

Firstly, you will need to have downloaded Blender and Unity / Unity Hub. For Unity, you will probably need to also set up an account. This guide was based on using Blender v3.2.1 and Unity 2020.3.39f1 Intel.

You will also need to download the UniVRM package for Unity. I used v0.103.2, which was the latest version at the time. Make sure you download the file named something like UniVRM-0.xxx.x_xxx.unitypackage. You don’t need the other files.

How to create a VRM file from a Ready Player Me avatar

  1. Create a folder that you’re going to store all the avatar assets in, let’s call it vrm_assets.
  2. Create an account on ReadyPlayer.Me, and build an avatar for yourself. It’s pretty fun.
  3. Click on “My Avatars”. You may need to click on Enter Hub to see this menu option.
  4. Click on the 3-dots icon on your avatar, and select “Download avatar .glb”, and store it in vrm_assets (or whatever you called that folder before).
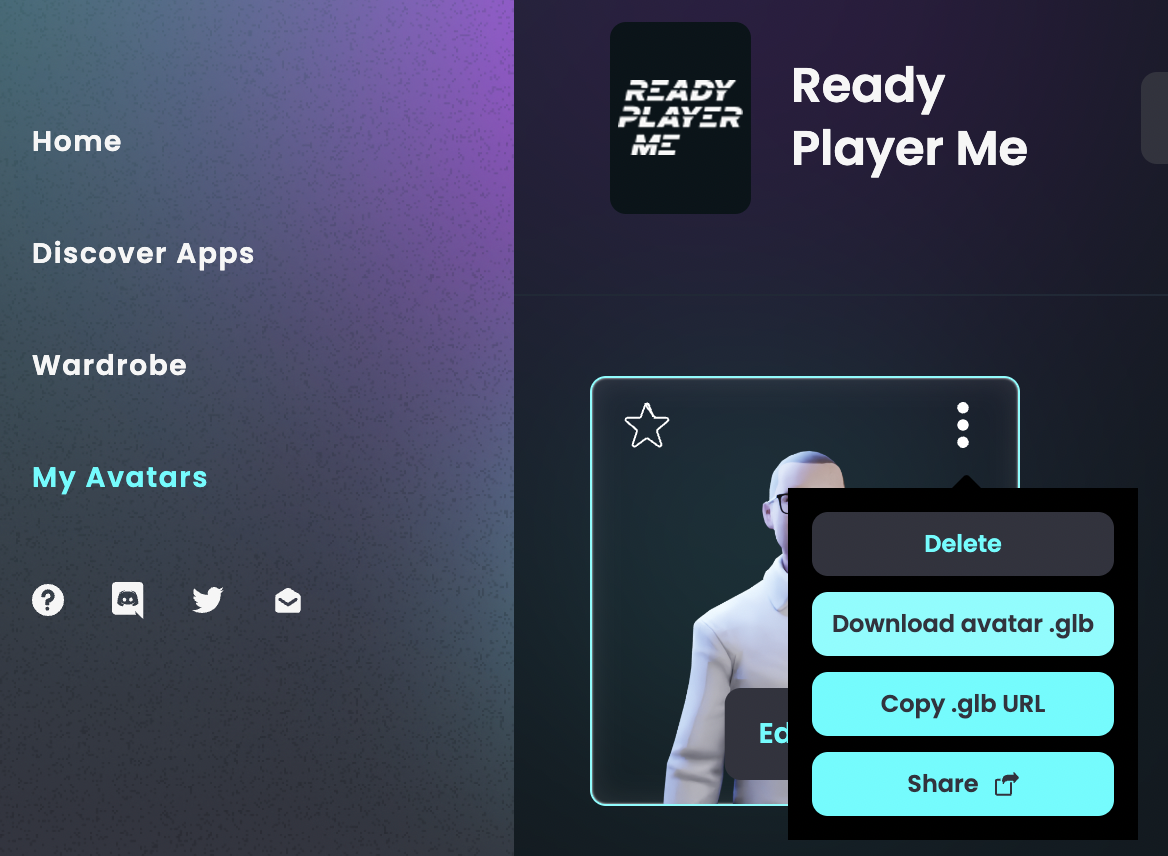
    screenshot of page within Ready Player Me showing the menu to download a GLB file
  5. Open Blender, and start a New File of the General type.
  6. In the Scene Collection menu, right-click the Collection and choose Delete Hierarchy, to get rid of everything in the scene.
  7. Then select File > Import > glTF 2.0 (.glb/.gltf) menu option, pick the avatar GLB file that you downloaded from ReadyPlayer.Me and stored in vrm_assets, and click “Import glTF 2.0”.
  8. If you’re worried that all of the colours and textures are missing, you can get them to appear by pressing “Z” and selecting Material preview, but you can skip this step.
  9. Select the Texture Paint on the top menu bar to enter the Texture Paint workspace.
  10. Change the “Paint” mode to the “View” mode in the menu in the top left of the Texture Paint workspace screen.
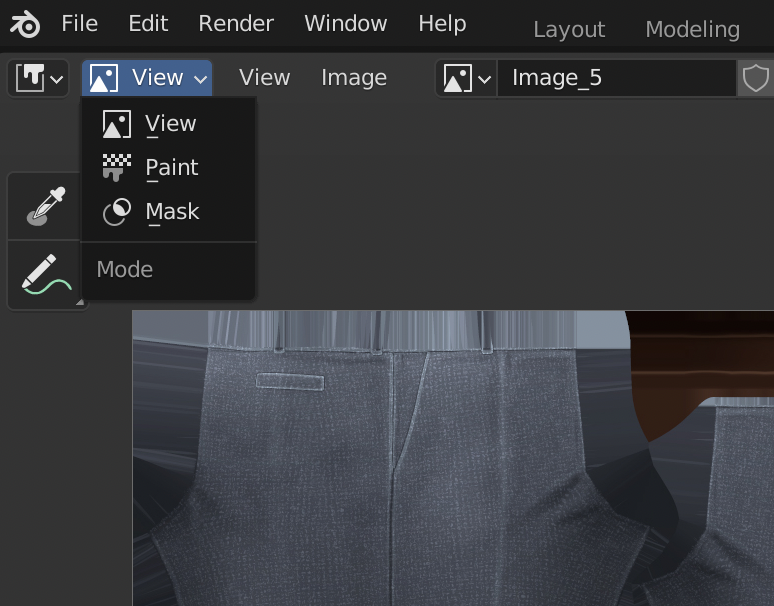
    screenshot of Blender showing where the View menu is
  11. Then use the texture drop-down in the menu bar at the top to select each Image_0, Image_1, texture etc. in turn.
  12. For each texture, select the  Image > Save As menu option to save as individual images in your vrm_assets folder. Some of the textures could be JPG files while others are PNG files. Don’t worry about that. Just make sure you save all the images, but you can ignore “Viewer Node” or “Render Result”.
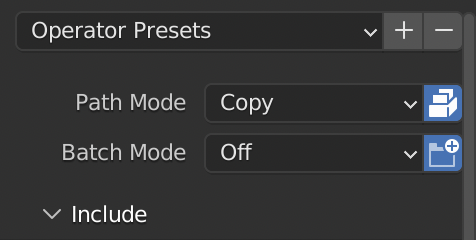
  13. Now select File > Export > FBX (.fbx) and before you save, change the “Path Mode” to “Copy” and click on the button next to it to “Embed Textures”. Then click the “Export FBX” button to save it into vrm_assets as well.
    Screenshot in Blender showing where to set Path Mode to Copy
  14. Close down Blender, and open up Unity Hub.
  15. Create a New Project, and select an Editor Version that begins 2020.3 and using the 3D Core template. Give the project a name that works for you, but I will use “VRM init”. Click “Create project”.
  16. Wait a little while for it to start up, then a blank project will appear. The first thing to do is bring in the UniVRM unitypackage file, so drag that from the file system into the Assets window. You will be shown an import window, with everything selected. Just click Import to bring it all in. After it’s done, UniGLTF, VRM and VRMShaders will be added to the Assets window.
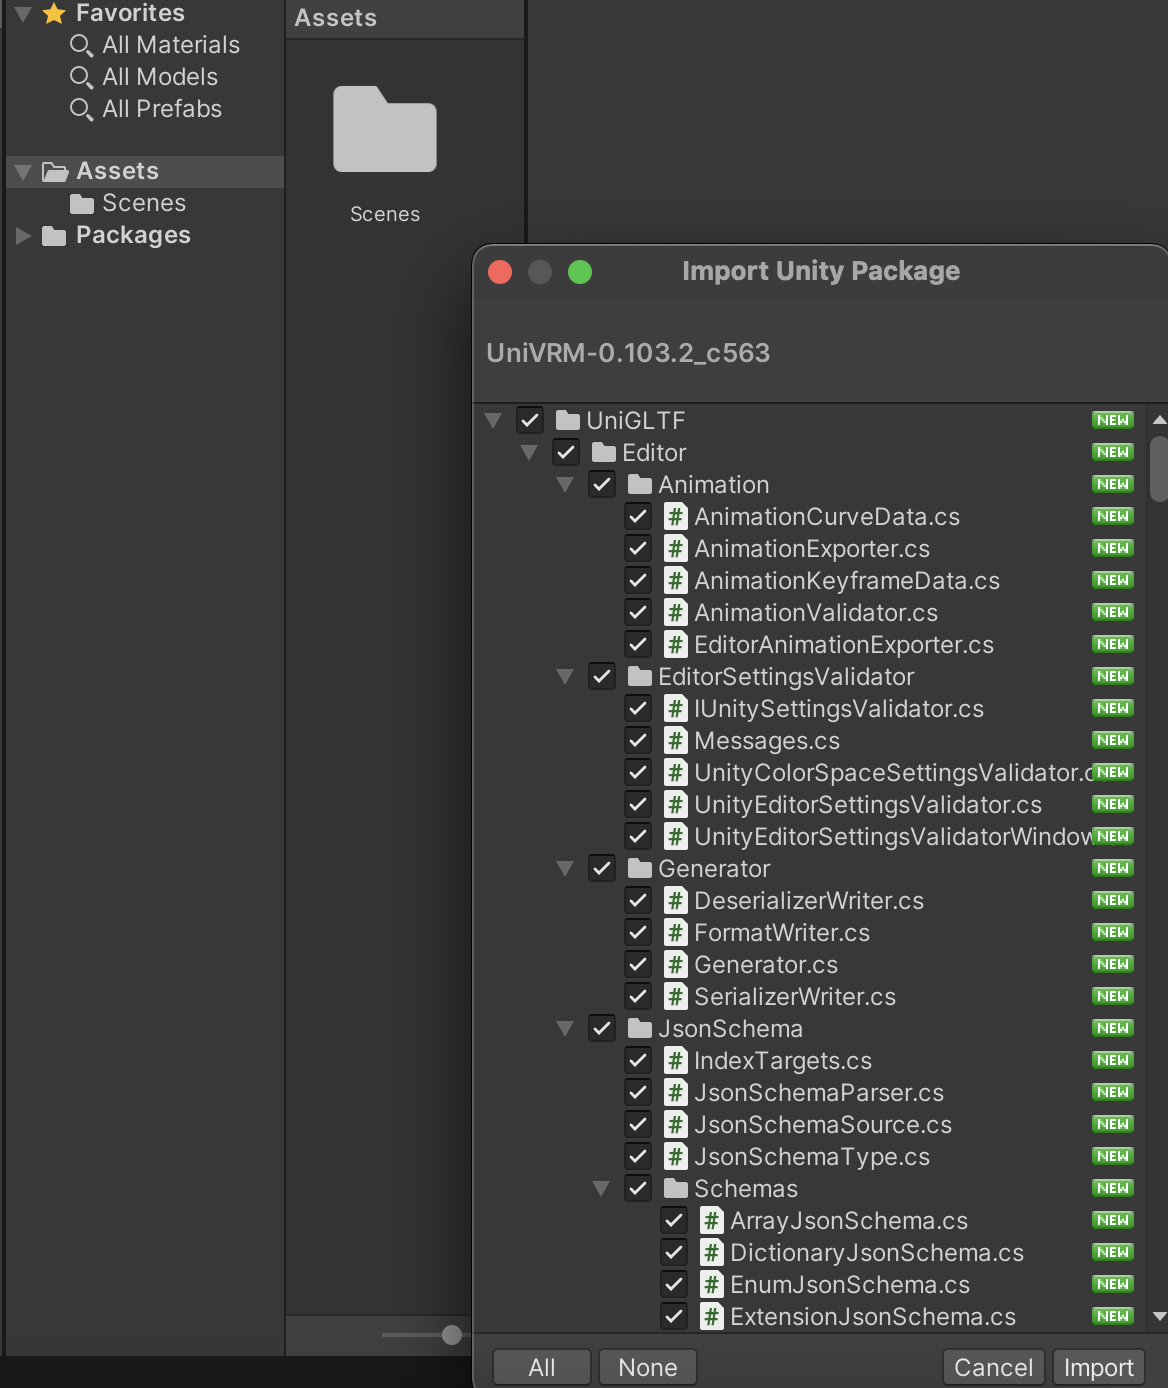
    Screenshot of Blender showing the import of the unity package
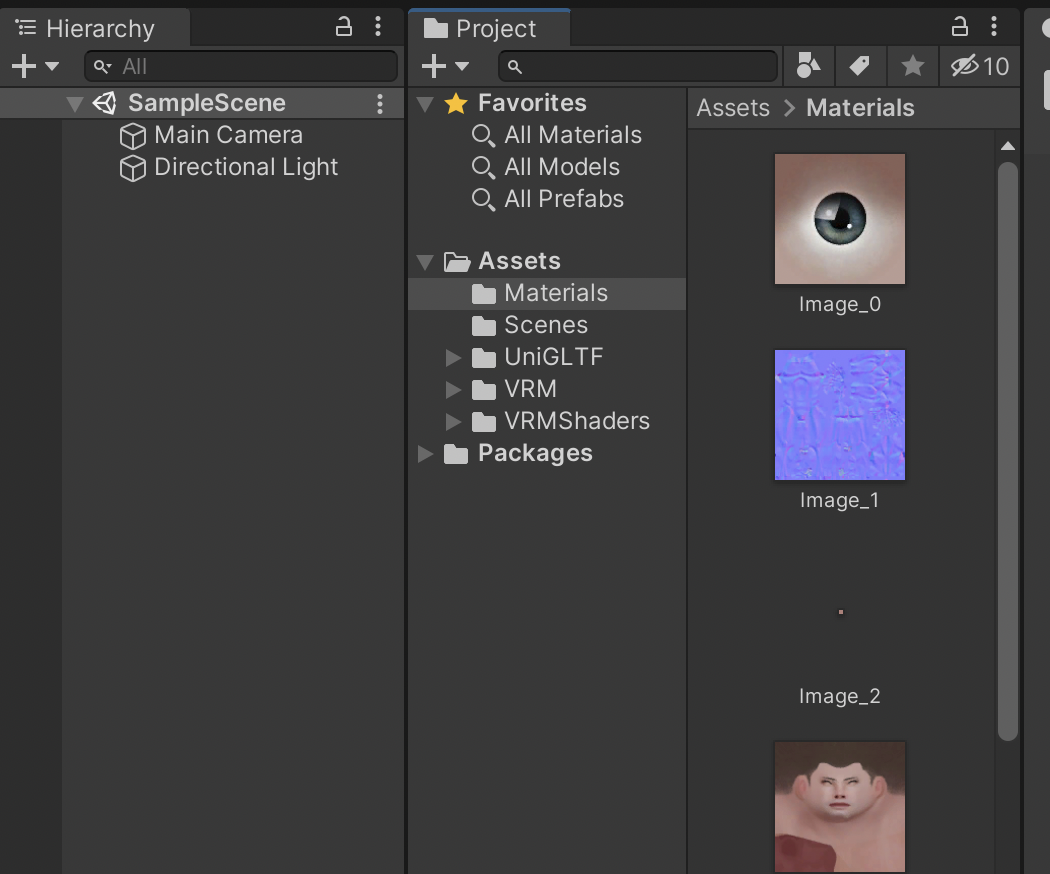
  17. Create a new folder in the Assets window called Materials. Open the Materials folder, then drag all the texture files from vrm_assets over into it.
    Screenshot of Unity showing the textures in the Materials folder
  18. Go back out of the Materials folder to the top level of Assets, and drag the FBX file that you exported from Blender into the same Assets window. The model will appear there after a little while.
  19. If at any point you get an error message like “A Material is using the texture as a normal map”, just click “Fix now”.
  20. Click on the model, then in the Inspector window, click on Rig. Choose Animation Type to be “Humanoid”. Click Apply.
  21. Staying in the Inspector window, click on Materials. Choose Material Creation Mode to be “Standard (Legacy)”, choose Location to be “Use External Materials (Legacy)”, and leave the other options at their defaults (Naming as “By Base Texture Name” and Search as “Recursive-Up”). Click Apply.
  22. Drag the model from Assets into the Scene.
  23. If your model is meant to look like an anime figure, do this step, but otherwise (e.g. for more realistic avatars) skip it. Expand the newly created avatar in the Hierarchy window, and for each Material listed (which should be everything but Armature), click on it, then scroll down in the Inspector to the Shader. Click on the Shader drop-down (it may say something like “Standard”) and change it to VRM > MToon. Do this for all the materials in the model.
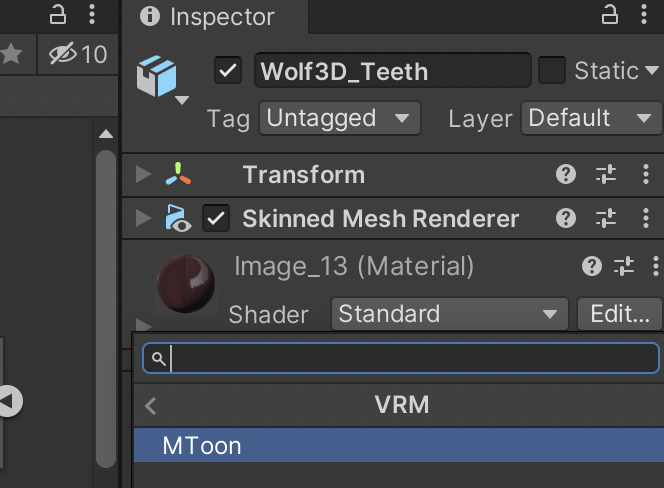
    Screenshot of Unity showing where to change the material Shader
  24. Alternatively, you can do other tweaks to the materials at this point. I find Unity makes the textures look a little grey, so this can be corrected by going into each Material as described in the previous step, opening up the Shader and changing the colour next to Albedo to use Hexadecimal FFFFFF (instead of CCCCCC). This is completely optional though.
  25. Click on the avatar in the Hierarchy window, and then in the VRM0 top-level menu of Unity, select Export to VRM 0.x resulting in the export window popping up.
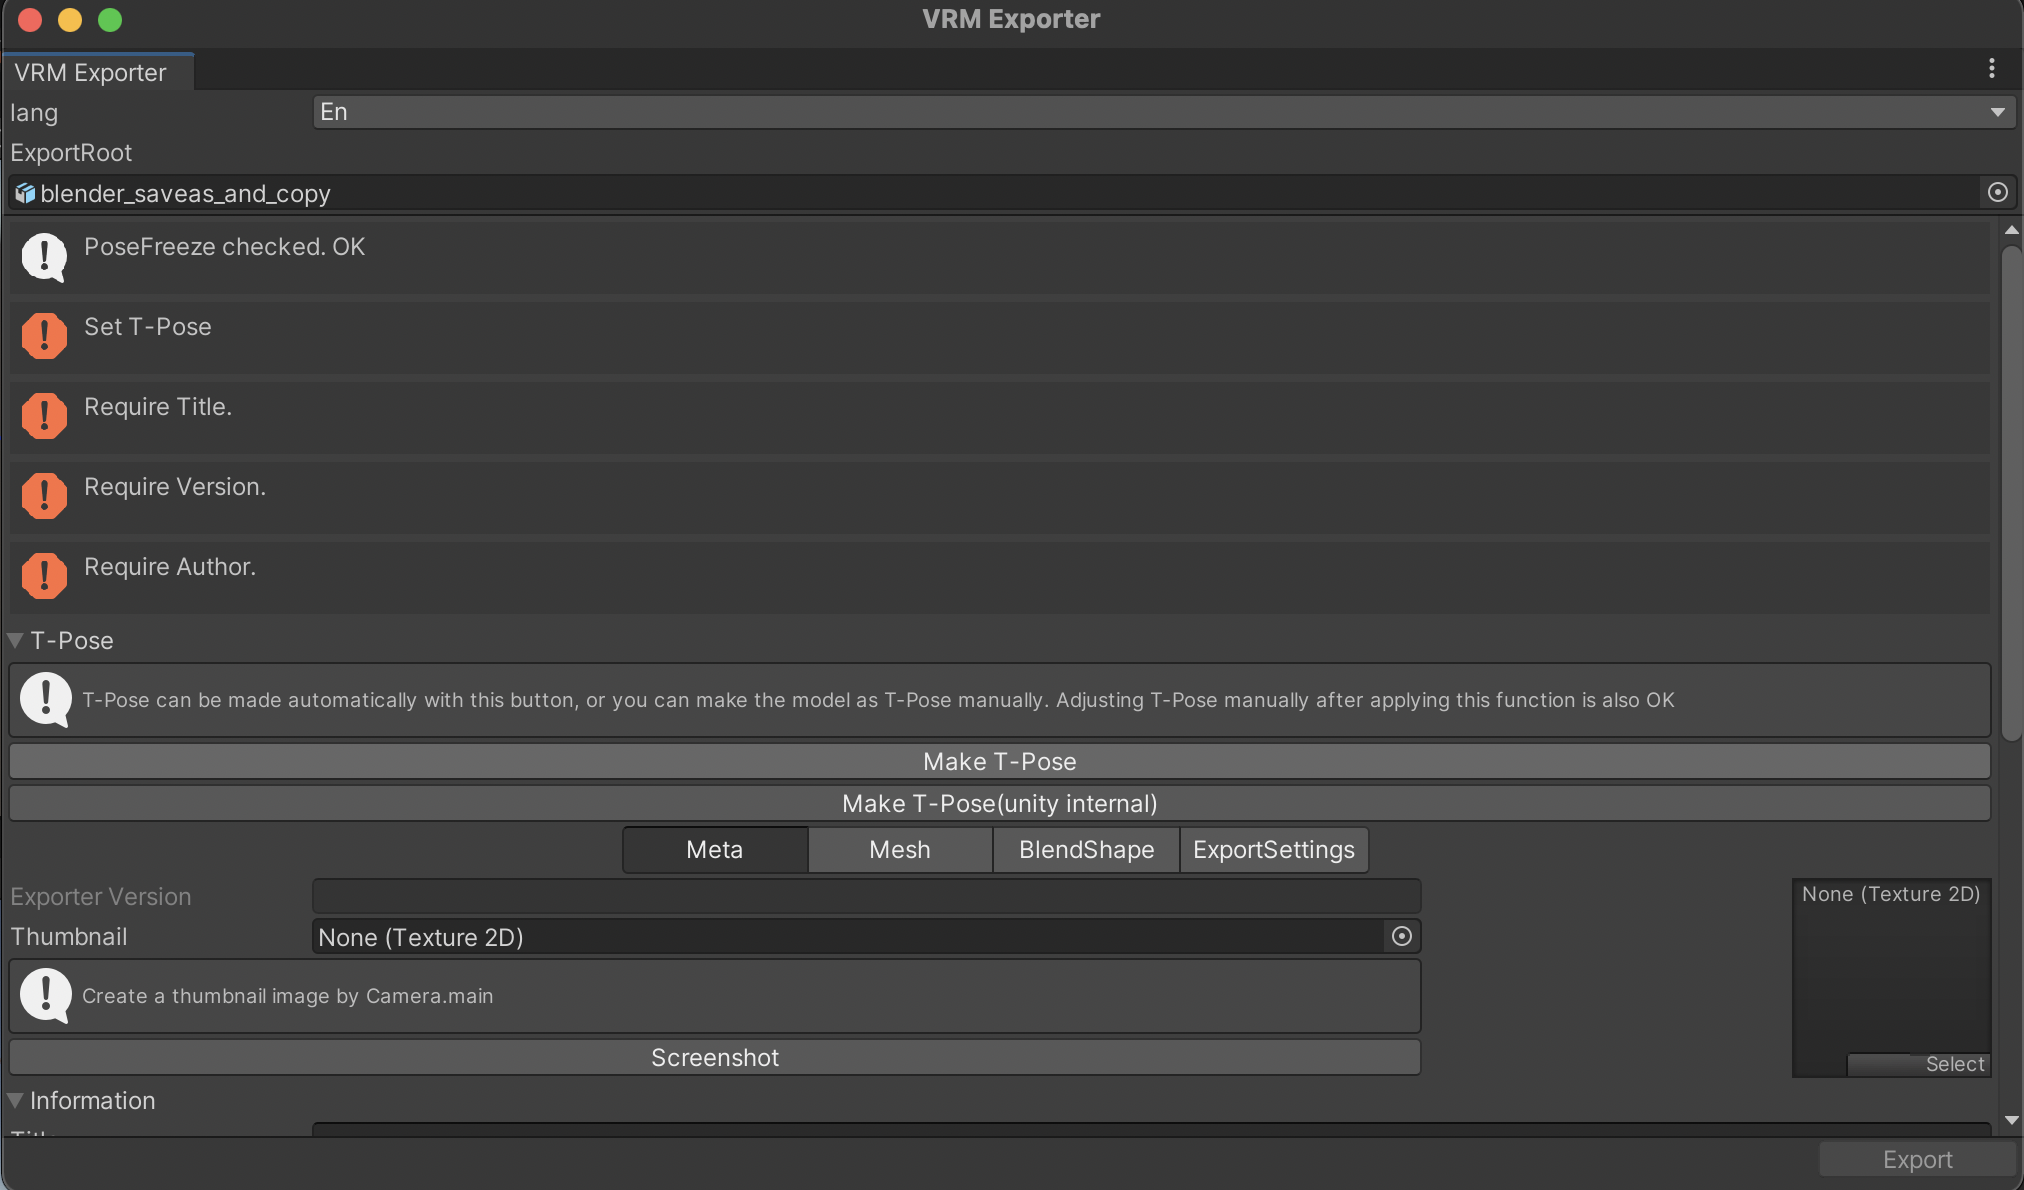
    Screenshot of Unity showing the VRM export window
  26. Click on “Make T-Pose”. Scroll down a bit and enter a Title (ie. the name of your avatar), a version (e.g. 1.0) and the Author (i.e. your name). Then click Export. Choose a name like “avatar” and save the VRM file into your vrm_assets folder.
  27. Delete the avatar that you just exported from the Scene by right-clicking it in the Hierarchy and choosing Delete. This just keeps the Scene neat for later.
  28. Now, drag the newly-saved VRM file into the Assets window of your Unity project. It is time to configure the lip synch and facial expressions.
  29. Double-click on the BlendShapes asset (if you had saved the VRM file as avatar.vrm, this asset will be called avatar.BlendShapes) to show all the expressions that can be configured. Clicking on BlendShape will allow you to easily see and configure them in one place.
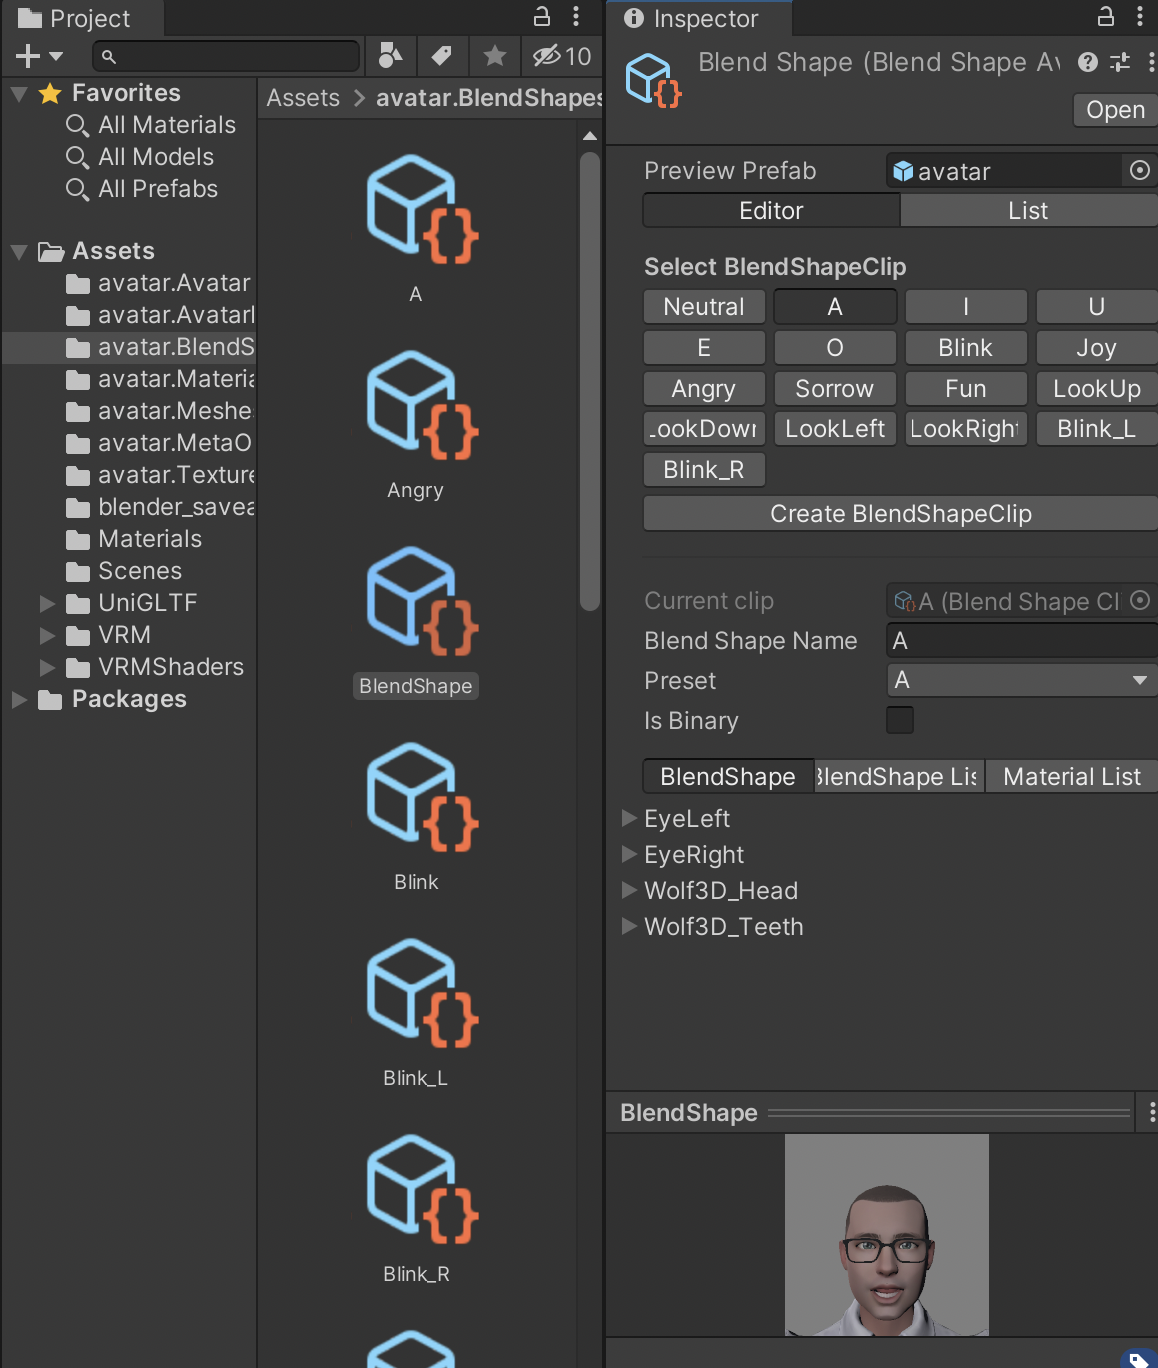
    Screenshot of Unity showing the configuration of Blend Shape
    Configuring the vowels will allow lip synch to work with your avatar, but you should configure all of it to ensure your avatar doesn’t look too wooden. Note that the vowels are in the Japanese order: A, I, U, E, O. Here are the settings that I used, but different avatars will need different values.
    • A:
      • Wolf3D_Head.viseme_aa 100
      • Wolf3D_Teeth.viseme_aa 100
    • I:
      • Wolf3D_Head.viseme_I 100
    • U:
      • Wolf3D_Head.viseme_U 100
    • E:
      • Wolf3D_Head.viseme_E 100
      • Wolf3D_Teeth.viseme_E 30
    • O:
      • Wolf3D_Head.viseme_O 100
      • Wolf3D_Teeth.viseme_O 100
      • Wolf3D_Teeth.mouthOpen 15
    • Blink:
      • Wolf3D_Head.eyesClosed 100
    • Joy:
      • Wolf3D_Head.mouthOpen 60
      • Wolf3D_Head.mouthSmile 48
      • Wolf3D_Head.browInnerUp 11
    • Angry:
      • Wolf3D_Head.mouthFrownLeft 65
      • Wolf3D_Head.mouthFrownRight 65
      • Wolf3D_Head.browDownLeft 20
      • Wolf3D_Head.browDownRight 20
    • Sorrow:
      • Wolf3D_Head.mouthOpen 60
      • Wolf3D_Head.mouthFrownLeft 50
      • Wolf3D_Head.mouthFrownRight 50
      • Wolf3D_Teeth.mouthOpen 30
    • Fun:
      • Wolf3D_Head.mouthSmile 50
    • LookUp:
      • EyeLeft.eyesLookUp 36
      • EyeRight.eyesLookUp 36
      • Wolf3D_Head.eyeLookUpLeft 75
      • Wolf3D_Head.eyeLookUpRight 75
    • LookDown:
      • EyeLeft.eyesLookDown 40
      • EyeRight.eyesLookDown 40
      • Wolf3D_Head.eyeLookDownLeft 20
      • Wolf3D_Head.eyeLookDownRight 20
    • LookLeft:
      • EyeLeft.eyeLookOutLeft 67
      • EyeRight.eyeLookInRight 41
    • LookRight:
      • EyeLeft.eyeLookInLeft 41
      • EyeRight.eyeLookOutRight 67
    • Blink_L:
      • Wolf3D_Head.eyeBlinkLeft 100
    • Blink_R:
      • Wolf3D_Head.eyeBlinkRight 100
  30. Now go back to the top level of the Assets window and scroll down to the avatar VRM model, then drag it into the Scene.
  31. Just as before, in the VRM0 top-level menu of Unity, select Export to VRM 0.x. You can leave the fields as they are, or update then. Click on Export. Save your VRM file into your vrm_assets folder with a new name to reflect it now has the expressions configured.
  32. Quit and save Unity, in case you want to come back and make further tweaks. You now have a VRM model.

Test out the VRM file in the avatar application of your choice! Good luck.
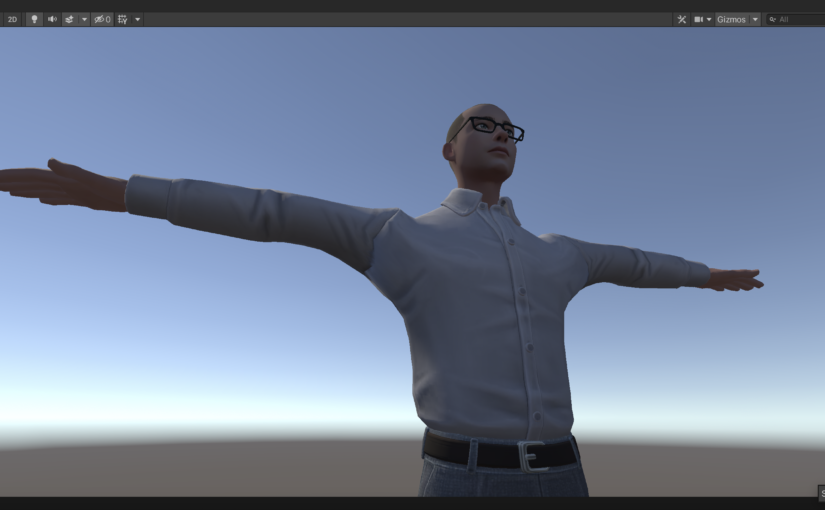
Turning up for work as an avatar

I don’t think we’re talking enough about avatars. I don’t mean the James Cameron film or the classic anime series. I’m referring to the computer 3D model that can represent you online, instead of a picture or video of the “real you”.

Due to the Covid-19 pandemic, we’ve had something like 5 years of technology uptake in an accelerated timeframe. Remote working has become much more common, with people regularly joining meetings with colleagues or stakeholders via services like Teams, Webex or Zoom rather than meeting up in person.

While pointing a camera at your face and also seeing an array of boxes containing other people’s faces has its merits, it can have a bunch of downsides. It turns out that many of these can be addressed by attending the meeting as an avatar rather via camera.

Interacting with others via avatars is the normal way of things when it comes to computer games. Many people are familiar with avatars from online social settings like Minecraft, Fortnite or Roblox. I’d think that for many kids today, they have spent more hours interacting online with others as an avatar than on camera.

So, it may be there is a generational shift coming as such people come up through our Universities and workplaces. But there are also fair reasons for moving to use avatars for meetings in any case. Here are five reasons why you should consider turning up for work online as an avatar.

1. It’s less stress

Being on camera can be a bit stressful, since your appearance is broadcast to all the other people in the same meeting, and other people can be a bit judgy. Why should your appearance be the concern of people that don’t need to share the same physical space as you?

If you attend a meeting as an avatar, you

  • Don’t have to shave, brush hair, put on makeup
  • Don’t have to worry about a pimple outbreak, or a bad haircut
  • Don’t have to get out of pyjamas, take off a beanie, or cover up a tattoo
  • Know there’s no chance of someone embarrassing wandering past in the background or a pet leaping up in front of you

2. You will appear more engaged

Well, if having the camera on is stressful, why not just turn it off? In some workplaces or schools, it is considered bad etiquette to turn off your camera in a group video call. It is not a great experience to be talking to a screen of black boxes and not seeing anything of your audience. Seeing a participant’s avatar watching back instead of a black box is a definite improvement.

However, sometimes it is a good idea to turn off the camera, such as when eating or having to visit the bathroom. The participant is still engaged in the meeting but for good reasons has turned off the camera. There is no need to do that with an avatar.

An avatar is also able to make eye contact through the meeting. Unfortunately, not everyone with a camera can do this, as the camera position might be to the side, above or below the screen that the participant is actually looking at. This tends to make the participant look distracted, as that would be how such behaviour would be interpreted in a face-to-face meeting. Avatars don’t have this issue.

3. Avatars are more fun

With Teams, Webex or Zoom, you can replace your background with a virtual background for a bit of fun. With an avatar, you can change everything about your look, and make these changes throughout the day.

You don’t even need to be human, or even a living creature. You might want to stick to an avatar that is at least humanoid and has a face, but there’s a huge creative space to work within.

In some online services, avatars are not limited to being displayed in a box (like your camera feed is), but can interact in a 3D space with other avatars. This also means that stereo audio can be used to help position the avatar in a physical space, making it easier to tell who is speaking by just where the sound is coming from, or distinguish a speaker when someone is talking over the top of them.

4. There may be less risk of health issues

Most group video meeting services show a live feed of your own camera during the call. It’s not exactly natural to spend hours of a day looking at yourself in a mirror, especially if the picture of you is (most likely) badly lit, from an odd or unflattering angle, and with a cheap camera lens. Then, if you couple this with seeing amazing pictures of others online, say on social media, it all appears to be a bit unhealthy.

While it’s not an official condition, there is some discussion about what is being called Zoom dysmorphia, where people struggle to cope due to anxiety about how they appear online. These people may go the plastic surgery route in order to deal with this.

Having a camera on all the time may also be generally unhealthy since it ties people to the desk for the duration of the call. Without this, for some meetings, people might instead take a call while walking the dog or taking a stroll around the block.

5. It works well for hybrid meetings

Hybrid is hard. It’s typically not a level playing field to have some meeting participants together in a room and some joining remotely. Having a camera at the front of a room capturing all of the in-person attendees means it is often difficult for the remote participants to see them.

The main alternative is that all the participants in the room have a device in front of them that allows them to join the meeting as a bunch of remote participants who happen to be in the same place. This usually results in a bunch of cameras pointing up people’s noses, as the cameras in a laptop or tablet are not at eye-level.

If the people in the room join as avatars, they can be showed nicely to the other participants, and the individuals’ cameras are often still adequate for animating their avatar to track with their face and body.

However

There are some down-sides to using avatars. It can make it more difficult for hard-of-hearing participants since they can’t rely on lip reading to follow a conversation. There will need to be avatar etiquette discussions so people aren’t made uncomfortable by certain types of avatar turning up to meetings. The technology is still evolving so it can look a bit unnerving if an avatar doesn’t show expected human emotions.

But directionally, avatars solve problems with our current group video meetings, and we can expect to see them become more mainstream over the coming years.

The new Star Wars?

There’s plenty that’s already been written on this movie, since it cost a bomb to make, the director waited a decade to make it until technology caught up to his vision, and it’s on a rapid trajectory to become the highest grossing film ever. But I’ve been hanging out to see it ever since I heard it would be in 3D, making it the first of the current crop of 3D films to be (at least, partially) live-action. And anyway, at least this review will be adhering to my strong policy of no spoilers.

Avatar

An enjoyable film set in a jaw-droppingly impressive sci-fi universe.

This is not a new tale, and is similar to Dune (or to Pocahontas, I am told), but is delivered with such commitment to the vision of James Cameron that it cannot fail to impress. This film is awash with a wealth of detail that even Tolkien would be proud of. With scientific consultants including a linguist from USC and a botanist from UCR, the world has a lot of detail behind it that you can actually see on the screen. New technologies needed to be developed to produce the computer animation and to shoot the actors in 3D.

The 3D is something that is hyped up in the marketing for this film. I saw this film in 3D, but although I suspect I would’ve enjoyed it as much, or more, in 2D. It is a little distracting – from time to time I found myself impressed by the technology rather than immersed in the tale. Although, perhaps this is something that over time people will get used to. If you see enough 3D video content, you will probably be able to look past the 3D aspect itself.

The themes in the movie are consistent with the effort that Cameron has invested in his new world – perhaps he subconsciously doesn’t want anyone to mess with it. The themes cover the effects of colonialism, the theory of gaia, and the problems of the military-industrial complex. If this doesn’t float your boat, you can still get lost in the film’s 3D beauty or its action sequences.

Although, ironically, the characters themselves don’t have a great deal of depth. I found it hard to really empathise with them, or find their motivations completely believable. However, at least the heroes are likeable.

Even if the characters don’t re-appear, I came away convinced that the world will appear again in further movies, games and books. Like Star Trek, Star Wars or Tolkien’s Middle Earth, the story universe has been so richly populated that sequels can’t help but be spun out form it. Sounds like Cameron has at least a couple more films up his sleeve for it, also.

My rating: 3.5 stars
***1/2

Reblog this post [with Zemanta]