Pancakes Recipe

I’ve been making this recipe for years, so am really just putting it here on the blog so I can easily refer to it. Currently it is sketched down the margin as a modification to the buttermilk pancakes recipe in a Donna Hay cookbook. Hopefully, after this I can just look it up online!

Ingredients

  • 90g unsalted butter
  • 2 cups plain flour
  • 1/2 cup caster sugar
  • 3 teaspoons baking powder
  • 1 egg
  • 1 3/4 cup whole milk

Method

  1. Melt the butter (e.g. 30s in the microwave) and set aside.
  2. Sift the flour, sugar and baking powder into a large mixing bowl.
  3. Make a well in the middle and crack the egg into it.
  4. Gradually stir in half of the milk to make a thick paste.
  5. Stir in the melted butter, the gradually stir in the remainder of the milk until the batter is smooth.
  6. Place a flat frying pan over medium heat to get warm, e.g. when butter sizzles.
  7. Use a 1/4 cup measure to pour batter onto frying pan. When bubbles appear, gently flip each pancake and continue cooking until browned on both sides.
  8. Serve with maple syrup (or whatever your favourite topping is).

Makes about a dozen pancakes.

Book Review – The Biggest Estate On Earth

I haven’t written a review here for ages, but I thought I’d write about this book to get some of my thoughts down about it. I just finished reading it during our holiday in New Zealand, and the contrast between a neighbouring country with a relatively recent human occupation (< 1000 yrs) and that of Australia was made even more stark through reading this book. For example, we visited Zealandia, a wildlife/eco-sanctuary which aims to provide a look at what New Zealand would have looked like before human habitation.  In Australia, where humans have been here for tens of thousands of years, what would such a project even mean?

The Biggest Estate on Earth

A historical analysis of the extent people managed the Australian landscape prior to European contact

The key controversy about this book is mentioned by Bill Gammage in his Appendix: that this is an application of the discipline of academic history to an area normally considered to be the domain of science – the Australian landscape. Accordingly, the book is dense with an overwhelming amount of source material that Gammage draws upon to support his analysis. This density made the book a bit of a chore for me to get through at times, and I maybe should have read just the first two and last two chapters, but the key insight is rewarding: that prior to European contact, people in Australia extensively managed the landscape to the extent we may even say that they “farmed” it.

As a historical text, Gammage draws upon both primary and secondary sources, but the former are extensive. Sources included writings from early explorers, surveyors, botanists, anthropologists, politicians, and farmers from across Australia, as well as paintings and maps from the time. A particularly interesting source for me was photographs of trees, which due to their multi-hundred year lifespans, are a form of documentation about what occurred in their vicinity during their life.

I found the argument repetitive, but still convincing, and am happy to believe that across Australia by 1788, people broadly shaped the landscape to suit their needs for both animal and plant food sources, as well as for large gatherings. Early Europeans to see this landscape described it over and over again as a “park”. The main tool used by indigenous peoples for shaping the land was controlled and timed burning, with fire being used on most days of the year, as people moved across their country. Since European contact and settlement, such practices have ceased and plant, animal and insect populations have also changed as a result. While it isn’t possible to return to the landscape or landcare regimes of those days, it highlights the knowledge that has been lost.

Rating by andrew: 3.5 stars
***1/2

Hacking the Alexa grammar

Amazon EchoFor Christmas, I got myself an Amazon Echo Dot (and I wasn’t the only one). For me, it’s been a fun and more convenient way to play music in our living room area, and I’ve been listening to more music as a result. I also had the idea that it would be nice to build some speech-driven interfaces to things.

It has been over a decade since I did speech recognition work. Speech recognition was used in one of the early projects that I did after I first left Uni, where I was part of a team that built a speech-driven personal assistant. It was a little ahead of its time, and never went anywhere.

Still, I thought I could put those slighty-rusty skills to use on the Echo, since Amazon provides a way to create Alexa skills (the name given to apps that run on the Echo behind the scenes). My idea was to use the Echo to provide a way to help the kids with maths, since they love to talk to “Alexa”.

Last week, my skill was published on Amazon’s list of Alexa skills. It allows someone to say “Alexa, tell me now if 1 plus 1 equals 2”, and will respond by saying that they’ve gotten this correct (or not). Unlike the basic Alexa functionality of doing maths, where someone might say “Alexa, what is 1 plus 1”, this skill forces the speaker to offer the answer and have it checked. This should be useful to anyone wanting to test their maths, and it supports addition, subtraction and multiplication. Basic users would probably use small numbers, but advanced users can use large numbers – the skill supports it all. Not negative numbers or zero, though!

Doing the coding behind this was straightforward; it was some simple Node.js code that runs on AWS Lambda. What was less straightforward was sorting out the grammar to use.

In speech recognition, the word “grammar” refers to the set of different phrases that an application can recognise at a point in time. A simple grammar is one that consists of just the phrases “yes” and “no”. A complex grammar might include every product for sale on Amazon itself and different ways to order them. The grammar is used by the speech recognition engine to improve its recognition, since it doesn’t need to always listen for every possible word in English, but only the specific words that are contained in the grammar.

To develop an Alexa skill, you need to hack together the basic Alexa grammar, together with an “invocation name”, and then the grammar that the skill itself can recognise. (Here, I’m using the word hack in its art-of-programming sense, not in the computer-intrusion sense.) Usually, the invocation name is a pronoun, e.g. “Dog Facts”, “Starbucks” or “GE Podcast Theatre”. However, it can be any set of words, and there is alternative dog fact skill that uses the invocation name “me a dog fact”.

This last one doesn’t seem to make sense until you remember that there is a grammar that comes before the invocation name. It starts with a “wake word” (one of “Alexa”, “Amazon” or “Echo”), then a variety of commands based around words like “tell”, “ask”, “start” or “open”. So, the invocation name gets added to this grammar, e.g. “Alexa, tell” + “me a dog fact” which makes a lot more sense.

Amazon publishes a list of constraints relating to invocation names. For my application, it would have been easiest to develop it using an invocation name like “Math Test” and then users would interact with it like “Alexa, ask Math Test to check if 1 plus 1 equals 2”. However, I wanted to see if I could do something that was easier for users.

Initially, I tried out the invocation name “me if”, which would produce nice interactions like “Alexa, tell me if 1 plus 1 equals 2”. However, using “if” violates one of Amazon’s constraints around invocation names, so I needed to find something else. That’s how I ended up with “me now” as my invocation name. Interactions become slightly longer, but still workable, like “Alexa, tell me now if 1 plus 1 equals 2”. To make this approach obvious to users, the skill is named “Tell Me Now”.

Now, I just need to get the kids to speak to Alexa about maths instead of music.

Minecraft Cake – Alex

Last year, my eldest daughter requested a Minecraft cake, and I made one by covering a butter cake with a mosiac of Minecraft-style tiles made from sugar cubes (coloured with different types of cordial syrup). It looked amazing, but was a lot of work. So, this year, when she asked for a Minecraft cake again, I wanted to do something a little less complicated.

The finished cake

The spec was a girl Minecraft character, lying down, made out of chocolate cake (inspired by this cake). As you can see, it looked just like the character Alex, and was almost all gone by the end of the party, so was pretty tasty, too. It was a chocolate butter cake, filled with chocolate butter cream, and coated with white chocolate ganache. If you want to do something similar, here’s what I did.

Ingredients 1 (chocolate butter cake)

  • 190g unsalted butter
  • 1/2 teaspoon vanilla extract
  • 1 cup caster sugar
  • 3 eggs
  • 2 1/4 cups of self-raising flour (minus 2 tablespoons)
  • 2 tablespoons cocoa powder
  • 1/2 cup milk

Method 1 (chocolate butter cake)

  1. This is based on the butter cake recipe from The Women’s Weekly Children’s Birthday Cake book. Firstly, get the oven warming at 190 degrees Celcius.
  2. Grease and line a large tin, 30cm x 21cm x 5cm. You can probably use something narrower if you need to, but the length is important.
  3. Bring butter to room-temperature if it isn’t already. I usually place it on a plate in about 1cm thick slices and zap in the microwave for 30s at 50% power.
  4. Place butter and vanilla in a mixer, and beat until light and creamy. Add sugar gradually while beaters are running at slow to combine. Add eggs one by one and give it a good beat after each to ensure it comes together.
  5. Remove bowl from the mixer, and sift in half the flour. Add half the milk and return to the mixer until combined. Then do the same thing again with the rest of the flour and milk, except this time include the cocoa powder with the sifted flour.
  6. You should have a thick mixture that can be dollopped into the greased tin. Smooth the top to ensure it’s level.
  7. Bake in the oven for 25-30 minutes or until a skewer comes out clean.
  8. Cool for a couple of minutes in the tin, then remove and and cool on a wire rack overnight. This will ensure cake is completely cool and can be most easily cut to shape the cake design.

The cake, baked

Ingredients 2 (white chocolate ganache)

  • 1 cup (250 mL) thickened cream (35% fat)
  • 660g of white chocolate melts

Method 2 (white chocolate ganache)

  1. Place the chocolate melts into a metal (or glass) bowl, and place on the stove over a saucepan with a little bit of water. (Note, if you want to make milk or dark chocolate ganache, you need to use a ratio of closer to 2g:1mL.)
  2. Pour the cream into a small saucepan, and heat on the stove until it is simmering temperature.
  3. Remove the small saucepan from the stove, and pour the cream into the chocolate. Stir until the mixture is smooth.
  4. Remove from the stove, allow to cool for a couple of minutes, and then put in the fridge for a couple of hours to stiffen. Note that this will (most likely!) make more ganache than you need, but it’s better to err on the safe side.

Ingredients 3 (chocolate butter cream)

  • 125g unsalted butter
  • 1 1/2 cups icing sugar (minus 1 heaped tablespoon)
  • 1 heaped tablespoon of drinking chocolate
  • 2 tablespoons milk

Method 3 (chocolate butter cream)

  1. This is also from The Women’s Weekly Children’s Birthday Cake book. Firstly, ensure the butter is at room temperature, e.g. using the technique above. This time, also ensure the milk is at room temperature.
  2. Put the butter in the bowl of a mixer and beat until it is as white as possible.
  3. Sift the icing sugar and drinking chocolate into another bowl, and gradually add about half of it into the butter with the mixer running.
  4. Add the milk gradually, then gradually add in the remaining sifted icing sugar.

Method 4 (constructing the cake)

  1. Days earlier, I had created a design for an icing sheet that would be used to decorate the exterior of the cake. This was based on the Alex design at Pixel PaperCraft.Minecraft cake template
  2. I uploaded this to an icing sheet printing service – in this case, I used CustomIcing.com.au – and had them print it onto an A3 sheet. I got it in the post a couple of days later, and kept it in a cold place until I needed it.
  3. I cut the cooled cake into three pieces. Two were 7cm x 7cm x 2.5cm squares that would be used for the head. The other was a T-shaped piece that was 21cm long, and 14cm wide at its widest point, but 7cm wide at its narrowest. This was actually a mistake, and it should have been more like 12.5cm wide at its widest point (the arms are 3 blocks wide each not 4 blocks). In any case, the exact measurements will depend on the icing sheet, so take measurements from that, and allow at least 0.5cm for icing.Pieces of cake
  4. Next, slice the T-shaped piece in half horizontally, so that it can be filled with the butter cream.
  5. Spread butter cream between the two square pieces and sandwich together. Place onto the plate or platter that will be used to present the cake. Also, spread butter cream into the T-shaped piece. Join with the square piece to make the shape of a block person (note the square piece is taller than the rest of the cake). If there isn’t enough butter cream coming right to the edge, pipe butter cream along the gap.Filled cake
  6. Remove the ganache from the fridge and use a palette knife to spread a decent coating over the cake. It’s okay if it gets crumbs in it or looks a bit rough at this point.Covered with ganache
  7. Place the cake in the fridge for the ganache to firm up again, and in the mean-time prepare the icing sheet.
  8. Cut along the outside of each of the shapes on the icing sheet using a sharp knife and a ruler. Also, cut along the base of the arm a little, so the hands are not connected to the legs.
  9. Remove the cake from the fridge. Using a jug of hot water and a tea towel, keep the palette knife hot (but dry) and shape the ganache so that it is smooth, level and has distinct corners. Also, use a ruler to ensure that the ganache-covered cake matches the measurements of the design on the icing sheet. You may want to trim off some of the cake, reapply ganache, refrigerate again and smooth the ganache before going on.
  10. Gently pick up the design from the icing sheet, peeling it away from the backing material. Slowly lower it onto the cake, possibly using a second person at this point! It is probably best to start with the legs and then lower the head piece on last. It is very easy to rip the icing sheet.
  11. Carefully smooth the icing sheet onto the ganache, and then return to the fridge until it is needed.The finished cake
  12. Eat it! It was devoured quickly by a dozen kids and a couple of nearby adults.The cake, finished

And remember, there’s no such thing as a bad idea

That is the cue – “remember, there’s no such thing as a bad idea” – for beginning the sport of suggesting ideas to my fellow brainstormers. However, instead of spurring me to reckless idea generation, it always stops me in my tracks while I re-evaluate the brainstorm facilitator. There is clearly such thing as a bad idea.

Playing in traffic while blindfolded.

Taste testing the contents of the laundry cupboard.

Stripping during a speech to parliament.

Assaulting an armed police officer.

It’s not hard to brainstorm them. So, why begin an exercise with people whose opinions you value by telling them such utter nonsense?

There are good intentions behind it, I admit. Even bad ideas may have the germ of a good idea hidden within them, and maybe one of the other brainstormers can bring that forth. Encouraging people to speak their ideas without thinking about their worth can improve the pace of the brainstorm session. Disruptive ideas can come from those outside of a field, because traditionally such ideas would have been considered “bad” by those inside the field.

On the other hand, perhaps merely being accepting of bad ideas is not going far enough. I’ve found that I can generate many more ideas of much greater variety if I focus on just generating bad ones.

Suggesting ideas in a language you don’t speak.

Brainstorming with just one person in the room.

Miming ideas to the other brainstormers.

Providing the same ideas as from the last brainstorm.

Overall, it is recognised that constraints enable creativity. The restricted forms of the haiku, sonnet or even limerick are able to result in enjoyable poetry. So, it’s understandable that coming up with “any idea, whether good or bad” will result in less creative ideas than coming up with “only bad ideas”.

Still, I don’t know why “only bad ideas” seems to work better for me than “only good ideas”. Maybe it’s simply that there are more bad ideas than good ones? Unfortunately, I can’t see a brainstorm session achieve a useful outcome if everyone involved is aiming for the worst ideas.

So, I’ve had an idea for how to harness the power of bad ideas in brainstorming. At the start of the session, the facilitator gives each brainstormer a note with either Good or Bad on it – which they keep secret from the other brainstormers – and this states the type of ideas they need to suggest. Maybe just a third of the brainstormers are given Bad, since their ideas will otherwise likely outnumber the Good ones.

This should help with improving the volume and diversity of ideas in brainstorms. In this case, the brainstorm facilitator will need to cue the start of the session with something like “Remember, I want to hear your ideas, even if they are bad.”

Tell me if this works for you, since I’m not sure if my idea for better brainstorming is a good or bad one.

Thinking of changes to traditional brainstorming.

Putting those thoughts out in public.

Child Wrangling

When I go on a long work trip, I often end up buying some books, because it is one of the rare times that I get to selfishly spend uninterrupted hours just reading. In September, I had a trip where I picked up a couple of parenting books.

My kids are getting bigger, and while at the moment I can get them to go where I need them to go by picking them up and taking them there, this is not sustainable. When we had babies, I read a bunch of books about how to get through that stage, but I hadn’t educated myself on parenting primary-school-age children. So, I picked two best-selling titles that seemed to have differing perspectives, and figured by reading both I would get a good coverage of the space. Now, by writing about them here, I am forced to understand them well enough to explain them.

The first book was 1-2-3 Magic by Thomas W Phelan. It is all about how to improve the behaviour of children 2-12yo through “effective discipline”, and is currently rated 4.7 out of 5 stars on Amazon (139 reviews). It is written by a child psychologist and is an easy read. I would say that this book has a basic assumption that children are happy and well behaved when they know what behaviour is required of them.

The second book was Calmer, Easier, Happier Parenting by Noel Janis-Norton. It is all about how to improve the behaviour of children 3-13yo through “five strategies” and is currently rated 4.5 out of 5 stars on Amazon (27 reviews). It is written by a child educator and is a comprehensive theory and practice for child-raising. This book has a basic assumption that children can work out what they are supposed to do, and will do the right things when they are supported appropriately and when doing the wrong things no longer works.

I seem to recall that I was a near-perfect child. So, my memories of how my own parents raised me should not be relied upon, and I find that I need to come up with things that suit my kids. Hopefully they will look back and think they were near-perfect as well.

Despite taking different approaches, the two books do agree on some aspects. There are five common strategies that I have noticed, and they seem reasonably sensible:

  1. Don’t ignore bad behaviour.
  2. Stay calm and don’t shout.
  3. Always follow through.
  4. Spend quality time with each child.
  5. All caregivers in a house act consistently.

However, there is probably more that they disagree about than they agree, as you may guess from their differing assumptions about children’s behaviours. In addition to the above five common strategies, Phelan’s book proposes two fundamental techniques for achieving household happiness:

  1. Impose time-outs for repeated bad behaviour.
  2. Establish everyday routines.

Of course, the book has plenty more detail around how to do this. In particular the title of the book refers to counting instances of bad behaviour, and putting a child into time-out when the third count is reached.

On the other hand, Janis-Norton’s book has different fundamental techniques that support a range of parenting strategies:

  1. Train children to want parental praise and recognition.
  2. Teach them how to verbalise thoughts and emotions.

Hers is a very thorough book, going into numerous examples over its 400+ pages. However, it doesn’t include any examples of disciplining children – at least not in a traditional way. Looking on the Internet, it seems this sort of approach is also known as positive discipline, and there are other authors out there that promote it. Janis-Norton many times states that she knows it may seem unbelievable that this could work, but reassures the reader that it does.

I haven’t decided yet how to put any of this into practice, but I feel now better equipped with a bunch of parental tools that I hope will make life easier and more sustainable. And if I don’t have to pick up and move children any more, my back will be thankful.

Wrist Computers

At some point in the last century, a strange thing happened: people took something that they’d been happy to carry around in their pockets for centuries and started to wear it on their wrist. Why?

I have just bought myself a smartwatch, and it’s got me thinking about this. A smart watch is typically what a 1980s calculator watch would be if someone invented it today. Because that’s basically what 99% of them are. Not calculator watches, of course, but stick with me for a bit. Just as in the 1980s, the most computing power an ordinary person could carry around in their pocket was a calculator, so people tried to put a tiny version of it on their wrist. These days, the most computing power an ordinary person can carry around in their pocket is a smartphone, so people are trying to put a tiny version of it on their wrists.

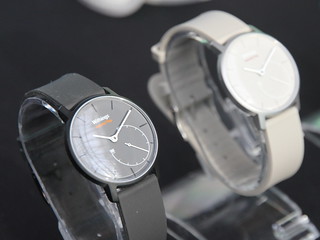
That said, you may not be too surprised to hear that the smartwatch I bought was part of the 1% that aren’t like that. It is a Withings Activité Pop, which is an analog watch that happens to also talk to my smartphone using Bluetooth. Withings isn’t the only maker of this sort of smart watch, e.g. you can also get a Martian watch which takes a similar approach to being “smart”. I expect other watch makers will put chips in their watches and it will become pretty normal soon.

I am really loving my Withings smartwatch. It automatically updates the time when daylight savings changes or when I travel into a different timezone. It has a pedometer inside it, and shows me my progress towards my daily step target on a dial on the face. It also has a bunch of other features, and sometimes gets new ones that appear for free, like tracking swimming strokes. But most of all, it looks good, is light on my wrist, and has a battery life of over 8 months. While these as expected features of a normal watch, they are rather novel in a smartwatch.

As a result, smartwatches haven’t really taken off yet in the way that, say, FitBit fitness trackers have. Is the smartwatch market destined for greatness or niche-ness?

Perhaps the history of the pocket watch has some relevant lessons, for which I will be drawing heavily on Wikipedia. The wearable watch was a 16th century innovation, beginning as a clock-on-a-pendant with only an hour hand. Some 17th century improvements brought the glass-covered face and the minute hand, and they became regularly carried in (waist coat) pockets at this time. It took until late in the 18th century for the pocket watch to move beyond a pure luxury item.

Pocket watches continued to be the dominant form of watch, at least for men, until the late 19th century, when the “wristlet” (we know it better as the wrist watch) came along. The British Army began issuing them to servicemen in 1917, where synchronising the creeping barrage tactic between infantry and artillery was important, and pocket watches were impractical. Reading the time at a glance was probably the first “killer app”, and by 1930, the ratio of wrist to pocket watches was 50 to 1. Within a couple of decades, the pocket watch had been completed disrupted.

While it was more convenient to read the time on a wrist watch than a pocket watch, it was also was also awkward to wear a heavy thing on a wrist, and in terms of fashion, the wrist watch was considered more of a women’s fashion item. In the end, World War I forced the issue, eliminating the fashion consideration, and the convenience factor overcame the weight problem.

Coming back to the present, UK mobile operator O2 published a report called “All About You” in 2012 that noted 46% of respondents had dispensed with a watch in favour of using their smartphone to check the time. It seems the greater utility of a smartphone has led people to forgo their watches, even if it means that time has gone back into the pocket.

So, there’s an argument that if the smartwatch provided similar utility to the smartphone, people would again shift from the pocket to the wrist. My Withings watch doesn’t in any way substitute for my smartphone, and is really a smartphone accessory. However, something like a LG Urbane Second Edition watch runs Android and has an LTE connection for calls and texting, and is more powerful than even a smartphone of a few years ago. Speech recognition can make up for the lack of keyboard entry, and a Bluetooth headset can enable private conversations.

However, economically a smartphone is actually a games platform, and games dominate the revenues from apps on smartphones. Making the smartwatch a viable games platform may be required for it to replace smartphones. Even in the 1980s, there were attempts to create games for the wrist, but they weren’t enormously successful compared to the game & (pocket) watch versions. Admittedly, there are games for modern smartwatches. However, they drain the battery and aren’t the same calibre as smartphone games.

If we measure the period of the smartphone since 2002, when Nokia introduced Series60 handsets, it has been with us for 13 years. The pocket watch, from invention to disruption, lasted 400 years, but declined due to the rise of the wrist watch in the last 50 of those years. If the smartwatch disrupted the smartphone at the same speed, it would need less than 2 years.

All I can say is: watch this space.

Windows 10 on Raspberry Pi 2

Windows 10 IoT Core on Raspberry Pi 2I was one of those who ordered the Raspberry Pi 2, when it was announced back in February 2015, off the back of the claims that it would run Windows 10. Not the full desktop version of Windows 10 of course, but a version for simpler devices. Still, it impressed me that here was a $36 computer that could run the latest version of Microsoft Windows.

Unfortunately, while the Pi 2 became available back then, the required version of Windows was not. It’s only been in the last month that Microsoft launched Windows 10 IoT Core, so I’ve finally had a chance to try it out.

For those that also are interested in this option, I thought I’d note down my experiences on installing it, connecting to it and running software on it.

Installing Windows 10 IoT Core

There are some official instructions provided by Microsoft on how to do this. However, they require that you are running Windows 10 on a PC, and none of my computers have Windows 10 yet. I also didn’t want to use up the hard disk space that would be needed if I had set up a Windows 10 virtual machine. I was more interested in unofficial options.

What didn’t work:

  • Using the Python ffu2img tool to convert the official Windows 10 IoT SD card image to something that could be loaded onto the SD card with something like Win32 Disk Imager. The ffu2img developer admits that they are pretty sure that there’s something wrong.
  • Downloading the official Windows 10 Home edition ISO and using the version of DISM in the sources directory there to load the SD card image.

What did work:

  • I got the official Windows 10 IoT Core for Raspberry Pi 2 ISO from Microsoft, opened it, ran the installer, and it put the flash.ffu file in C:\Program Files (x86)\Microsoft IoT\FFU\RaspberryPi2\
  • Next, I got the Windows ADK for Windows 10 installer from Microsoft, and it loaded a suitable version of DISM into C:\Program Files (x86)\Windows Kits\10\Assessment and Deployment Kit\Deployment Tools\x86\DISM\
  • Then I formatted my SD card using SD Formatter
  • I copied the flash.ffu file into the DISM directory and used it (following the instructions on the Raspberry Pi forums) in an Administrator Command Prompt to copy it onto my SD card
  • I safely ejected the SD card, and popped into the Pi and it booted up fine.

Connecting to Windows 10 IoT Core

Once the Pi got going, I needed to tell it what language to use. I had plugged a decent quality USB keyboard in, but it was extremely finnicky: key presses were seemingly ignored. In the end, I plugged a USB mouse in and it was much more responsive to mouse clicks.

Windows 10 IoT is really designed to run a single GUI application. It boots into one that shows the hostname and IP address for the Pi, as well as displaying some simple tutorial instructions. It’s designed to connect to Visual Studio 2015, and allow a developer to push their application straight to the Pi. However, I don’t work with my Pi that way – I connect into it and configure/run it via a remote shell.

It’s possible to SSH straight into the Pi (as user Administrator, initially, until you set up some other users). You basically get a DOS prompt. Cool! What was less straightforward was getting files onto it.

What didn’t work:

  • SCP – I kept getting an “exec request failed on channel 0” error
  • Trying to get the Pi to download files using an Invoke-WebRequest via PowerShell running on the Pi. The version of PowerShell seems to be missing some modules.

What did work:

  • The Pi appears on the LAN as a Windows network share. You can use a Windows PC and put in \\192.168.1.10\c$ (or whatever your IP address is) and then login as minwinpc\Administrator with your password. Voila!
  • Similarly, on a mac, you can access it via the Finder using Go > Connect to Server smb://192.168.1.14/c$ (or whatever your IP address is). The Pi will also then appear under /Volumes/c$/
  • Once the share has been opened, it’s straightforward to copy files to and from the Pi.

Running Software on Windows IoT Core

As mentioned above, the standard way to get software running on Windows IoT is for Visual Studio to load it onto the Pi over the network. However, I’m more interested in running standard server apps that don’t rely on the Microsoft ecosystem, so I focussed my efforts on getting Node.js to run on the Pi.

Microsoft is doing some very cool stuff around supporting platforms like Node.js and even Python on Windows IoT. It’s still very much in its early days, but shows promise.

Here’s what I did:

  • I downloaded and installed the Node.js Tools for Windows IoT (v1.1) from GitHub. These were installed into C:\Program Files (x86)\Node.js (chakra)\
  • I copied the whole Node.js (chakra)\ installation directory over to the Pi into C:\Node.js\
  • I downloaded the ARM version of node.exe from the same GitHub page as above, which I copied over the top of the previous (Intel version of) node.exe in C:\Node.js\
  • Set up the APPDATA environment variable to be somewhere useful (it wasn’t set for me): set APPDATA=C:\Users\Public
  • Set up other useful environment variables for Node by running: C:\Node.js\nodevars.bat
  • Now commands like “npm install -s express” and “node test.js” work.

While I could run simple Hello World style programs with Node that wrote text out to the screen, I was unable to get working a slightly more advanced Node program that ran a basic webserver.

Conclusions

It was fun to see Windows 10 boot up on the Raspberry Pi. However, I was a little disappointed how limited it was, given how powerful a Pi is with the default Linux-based OS.

Microsoft’s approach to developing for the Raspberry Pi brings something new to the space, and may make the platform more accessible to developers who are already adept with Microsoft tools. Still, it would’ve been nice to see the basic image come with something immediately useful, if only the new Edge web browser (this would’ve make super-cheap Internet Explorer based kiosks really simple to create).

There’s the old saying that you should always wait for the third version of a Microsoft OS. I don’t know if we’ll need to wait that long for a compelling Microsoft OS on Raspberry Pi, but I am excited to see what Microsoft does with this in future.

Facebook Node SDK example

I’ve been writing some Node.js software to interact with Facebook recently. To do this, I just picked the first SDK listed in the Facebook developer’s page for Node.js. However, I couldn’t find a good example listing of how to use this SDK to iterate over multiple pages of results. So, this is a quick post that will hopefully serve as such an example.

The complete Node.js application can be downloaded from Github at https://github.com/aesidau/sbs-headlines, but I’ll walk through it step by step here. The application will list the first 1,000 news headlines from the SBS News page on Facebook. However, before any of this will work, you will need to get the fb and async modules, so start with something like:

npm install fb
npm install async

Also, I assume that you’ve set up a Facebook application over at https://developers.facebook.com/ and have its app id and app secret to hand. In fact, for this Node.js example, I am assuming that these values are stored in the environment variables FB_APP_ID and FB_APP_SECRET, respectively.

The first step in any Facebook API application is to use these app credentials to get an access token that can be used in later Facebook API calls. In this example, I’m going to get a basic access token that isn’t associated with a Facebook user, so will be able to obtain only public information. That’s all we need here, anyway.

// Acquire a new access token and callback to f when done (passing any error)
function acquireFacebookToken(f) {
  FB.napi('oauth/access_token', {
    client_id: process.env.FB_APP_ID,
    client_secret: process.env.FB_APP_SECRET,
    grant_type: 'client_credentials'
  }, function (err, result) {
    if (!err) {
      // Store the access token for later queries to use
      FB.setAccessToken(result.access_token);
    }
    if (f) f(err);
  }); // FB.napi('oauth/access_token'
}

This has been written as a function so we can call it later. Note that it uses a callback to indicate to the caller when the process has been completed, passing back any errors that came up.

So far, so obvious. Now that the access token is sorted, let’s look at what is required to iterate over a Facebook feed using the API.

I’m going to use the doUntil function in the async module. This enables iteration of functions that return results in callbacks. The other thing to note is that each call to the Facebook API will return a “paging” object that will contain a “next” attribute but only if there is another page of results to retrieve. This attribute can be parsed to construct the next Facebook API query to obtain the next page of results.

I have also included a test for if the access token has expired. This shouldn’t happen in a simple app where the access token was only just acquired. However, in many apps, the access token may have been acquired hours before. So, if this code is to be reused, it’s a good idea to deal with this case.

// Process the Facebook feed and callback to f when done (passing any error)
function processFacebookFeed(feed, f) {
  var params, totalResults, done;

  totalResults = []; // progressively store results here
  params = { // initial set of params to use in querying Facebook
    fields: 'message,name',
    limit: 100
  };
  done = false; // will be set to true to terminate loop
  async.doUntil(function(callback) {
    // body of the loop
    FB.napi(feed, params, function(err, result) {
      if (err) return callback(err);
      totalResults = totalResults.concat(result.data);
      if (!result.paging.next || totalResults.length >= 1000) {
        done = true;
      } else {
        params = URL.parse(result.paging.next, true).query;
      }
      callback();
    }); // FB.napi
  }, function() {
    // test for loop termination
    return done;
  }, function (err) {
    // completed looping
    if (err && err.type == 'OAuthException') {
      // the access token has expired since we acquired it, so get it again
      console.error('Need to reauthenticate with Facebook: %s', err.message);
      acquireFacebookToken(function (err) {
        if (!err) {
          // Now try again (n.b. setImmediate requires Node v10)
          setImmediate(function() {
            processFacebookFeed(f);
          }); // setImmediate
        } else if (f) {
          f(err);
        }
      }); // acquireFacebookToken
    } else if (f) {
      f(err, totalResults);
    }
  }); // async.doUntil
}

Lastly, we just need to wire these two functions together so that we get the access token, retrieve the results (i.e. the headlines from SBS World News Australia), and then print them out.

acquireFacebookToken(function (err) {
  if (err) {
    console.error('Failed authorisation to Facebook: %s', err.message);
  } else {
    console.log('Acquired Facebook access token');
    // Now let's do something interesting with Facebook
    processFacebookFeed('SBSWorldNewsAustralia/feed', function (err, results) {
      if (err) {
        console.error('Failed to retrieve Facebook feed: %s', err.message);
      } else {
        // Print out the results
        results.forEach(function (i) {
          var headline = i.message || i.name;
          // If it's an embedded video, possible there's no headline
          if (headline) {
            console.log(headline);
          }
        }); // results.forEach
      }
    }); // processFacebookFeed
  }
}); // acquireFacebookToken

And that’s it. I hope this has been useful for others. Grab the complete application from GitHub to try it out, but make sure you set up your environment variables for the App ID and App Secret first.

XBMC on Raspberry Pi 2

Raspberry Pi running OpenELEC with XBMCI got a Raspberry Pi 2 on the first day they were available in Australia. It has twice the memory and is up to six times faster than the old Raspberry Pi, and at some point in the future it will be able to run Windows 10. But in the mean-time, I thought it would be cool to see what sort of media centre appliance I could get going on a $36 computer. This post is for posterity, but also in case it helps others who are trying to get this working.

The default media centre platform is called XBMC, but the first thing I learnt was that it was now called Kodi. According to the Kodi Wiki, there are just two versions that work on the Pi 2. The first one I tried was OSMC, but it is still in Alpha release and not so stable. The other is OpenELEC and v5.0.3 supports the Pi 2.

Following the installation instructions didn’t work for me, perhaps running Windows 7 64-bit caused problems for the Win32 Disk Imager program. So, I tried using WinFLASHTool instead, and it worked for me perfectly.

This got me a media centre on the Pi, but what I really wanted was to be able to control it from the TV remote control – this requires HDMI CEC to work. I have an LG 42LN5710 television, and LG calls their implementation of CEC “Simplink”. There are two ways to turn it on: press the Simplink button on the remote, or press the Input source button on the remote and then the green button on the remote. Neither worked for me.

After a lot of stuffing around, I learned two things that got me on the right track.

Firstly, not every HDMI cable supports CEC. I had a cheap HDMI 1.3 cable that was fine for delivering A/V from the Pi to the TV, but I needed to replace it with a new cable. CEC is implemented in a single wire in the cable, and is apparently mandatory, but not mandatory enough.

Secondly, any HDMI device can communicate with any other HDMI device connected on any HDMI cable using CEC. I had three HDMI devices (including the Pi) plugged into my TV. One of them was misbehaving, and stopping CEC on the Pi from working. I had to unplug the rogue device and reboot the Pi.

After this, I was able to turn on Simplink and the TV identified the Pi as a Simplink device. Excellent!