Making a VRM avatar from Ready Player Me

When I went looking to create an avatar, I discovered that there were a lot of options. There are 2D avatars that look like animated illustrations and 3D avatars that look like video game characters. There are full-body avatars, and half-body avatars (the top half, if you’re wondering). There are avatars tied to a particular app or service, and avatars that use an interoperable standard. There are many standards.

I decided that I wanted a full-body 3D avatar, since this seems to be the way things are headed. If I was using a Windows PC, I would be able to use something like Animaze and have my avatar track to my gestures and expressions. However, I am currently using a Mac and there are fewer options, especially in English. I was able to find the browser-based FaceVTuber service and the application 3tene, though. 3tene requires avatars in the VRM standard, so that made my decision for me.

The easiest way to create a VRM avatar seems to be to use VRoid Studio application, although the resulting avatars look like anime characters. I wanted to create a more realistic looking 3D avatar, and a service like ReadyPlayer.Me would be perfect, as it quickly creates an avatar based on a photo. The catch is that ReadyPlayer.Me does not yet export a VRM file version of their avatars. But there is a way to do it, if you’re willing to jump through some hoops.

This is a guide that I’ve put together based on trial and error, and heavily inspired by ReadyPlayer.Me’s instructions on exporting to a GLB file for Unity and Mada Craiz’s video on converting a ReadyPlayer.Me GLB file into a VRM file.

Firstly, you will need to have downloaded Blender and Unity / Unity Hub. For Unity, you will probably need to also set up an account. This guide was based on using Blender v3.2.1 and Unity 2020.3.39f1 Intel.

You will also need to download the UniVRM package for Unity. I used v0.103.2, which was the latest version at the time. Make sure you download the file named something like UniVRM-0.xxx.x_xxx.unitypackage. You don’t need the other files.

How to create a VRM file from a Ready Player Me avatar

  1. Create a folder that you’re going to store all the avatar assets in, let’s call it vrm_assets.
  2. Create an account on ReadyPlayer.Me, and build an avatar for yourself. It’s pretty fun.
  3. Click on “My Avatars”. You may need to click on Enter Hub to see this menu option.
  4. Click on the 3-dots icon on your avatar, and select “Download avatar .glb”, and store it in vrm_assets (or whatever you called that folder before).
    screenshot of page within Ready Player Me showing the menu to download a GLB file
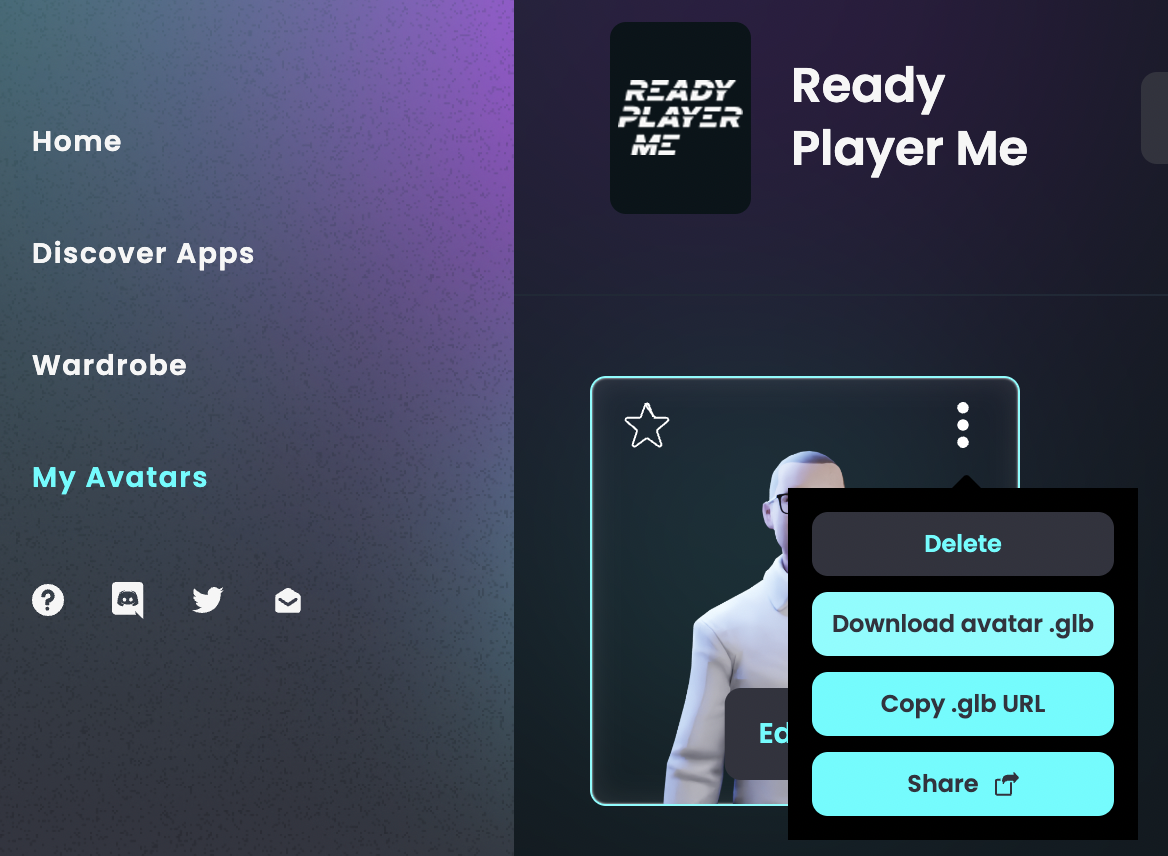
  5. Open Blender, and start a New File of the General type.
  6. In the Scene Collection menu, right-click the Collection and choose Delete Hierarchy, to get rid of everything in the scene.
  7. Then select File > Import > glTF 2.0 (.glb/.gltf) menu option, pick the avatar GLB file that you downloaded from ReadyPlayer.Me and stored in vrm_assets, and click “Import glTF 2.0”.
  8. If you’re worried that all of the colours and textures are missing, you can get them to appear by pressing “Z” and selecting Material preview, but you can skip this step.
  9. Select the Texture Paint on the top menu bar to enter the Texture Paint workspace.
  10. Change the “Paint” mode to the “View” mode in the menu in the top left of the Texture Paint workspace screen.
    screenshot of Blender showing where the View menu is
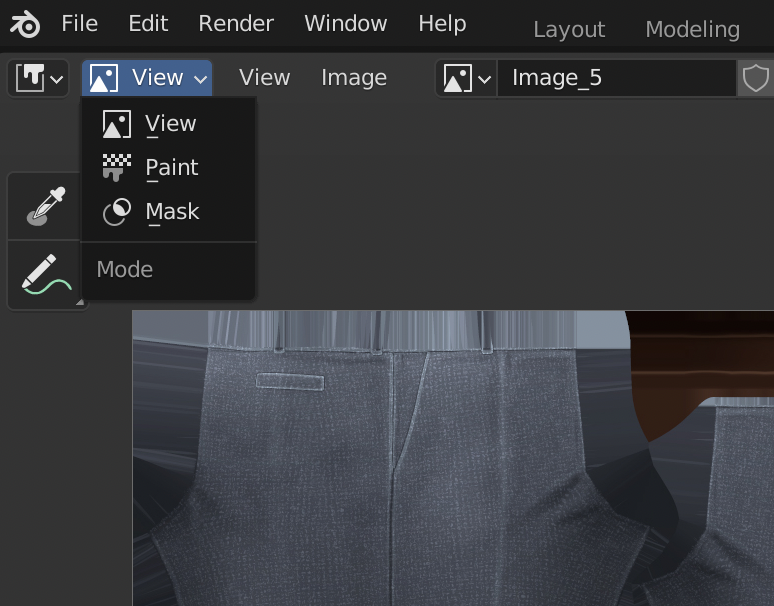
  11. Then use the texture drop-down in the menu bar at the top to select each Image_0, Image_1, texture etc. in turn.
  12. For each texture, select the  Image > Save As menu option to save as individual images in your vrm_assets folder. Some of the textures could be JPG files while others are PNG files. Don’t worry about that. Just make sure you save all the images, but you can ignore “Viewer Node” or “Render Result”.
  13. Now select File > Export > FBX (.fbx) and before you save, change the “Path Mode” to “Copy” and click on the button next to it to “Embed Textures”. Then click the “Export FBX” button to save it into vrm_assets as well.
    Screenshot in Blender showing where to set Path Mode to Copy
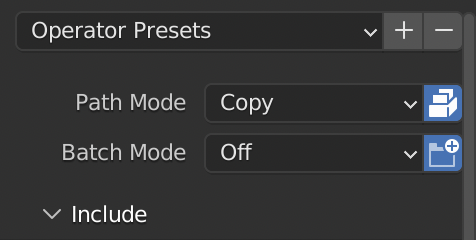
  14. Close down Blender, and open up Unity Hub.
  15. Create a New Project, and select an Editor Version that begins 2020.3 and using the 3D Core template. Give the project a name that works for you, but I will use “VRM init”. Click “Create project”.
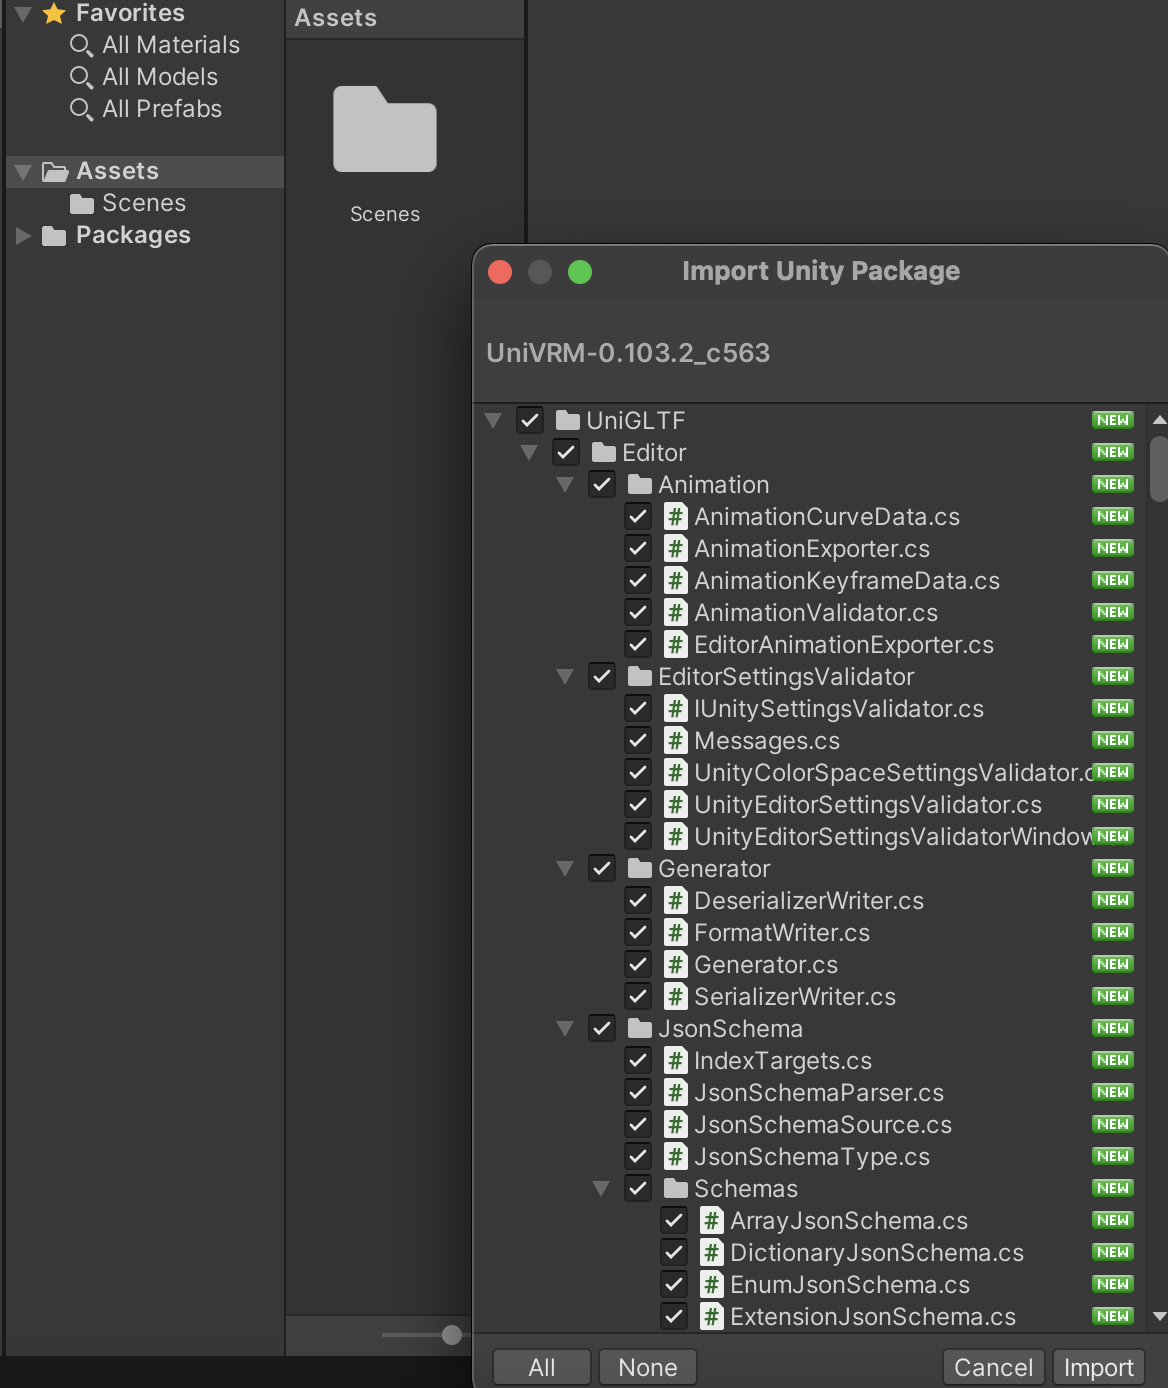
  16. Wait a little while for it to start up, then a blank project will appear. The first thing to do is bring in the UniVRM unitypackage file, so drag that from the file system into the Assets window. You will be shown an import window, with everything selected. Just click Import to bring it all in. After it’s done, UniGLTF, VRM and VRMShaders will be added to the Assets window.
    Screenshot of Blender showing the import of the unity package
  17. Create a new folder in the Assets window called Materials. Open the Materials folder, then drag all the texture files from vrm_assets over into it.
    Screenshot of Unity showing the textures in the Materials folder
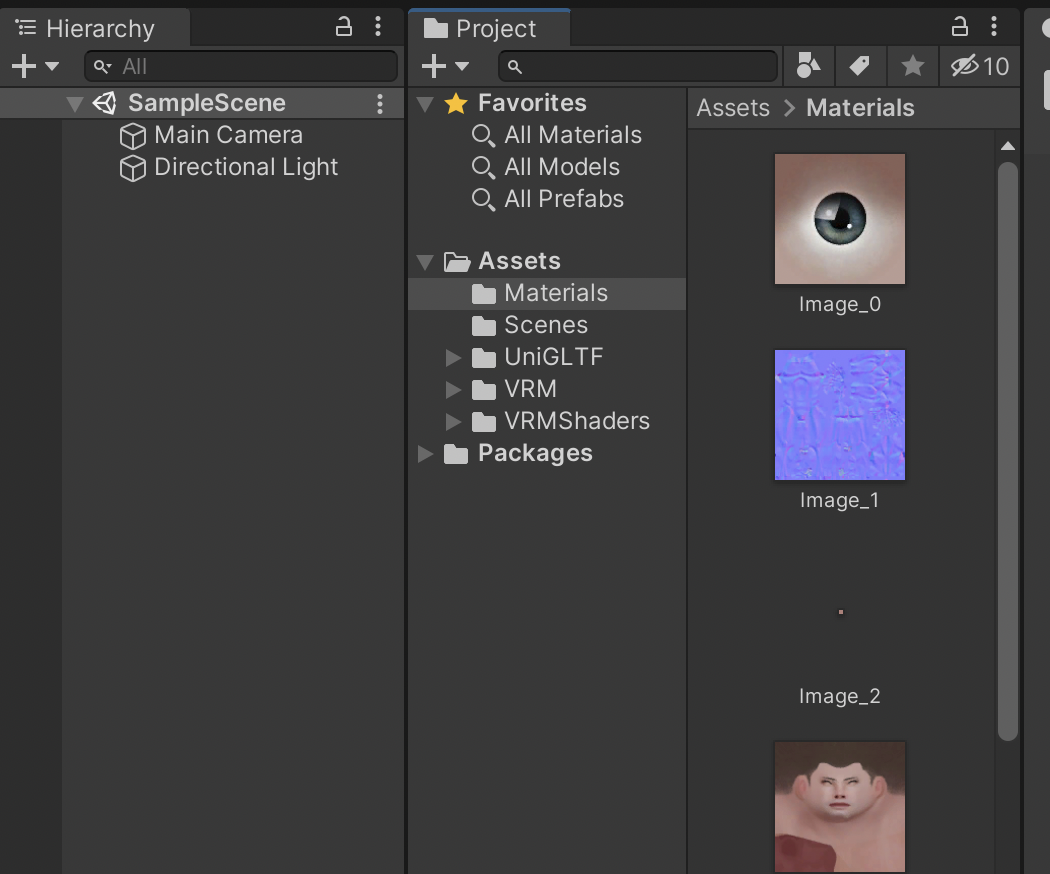
  18. Go back out of the Materials folder to the top level of Assets, and drag the FBX file that you exported from Blender into the same Assets window. The model will appear there after a little while.
  19. If at any point you get an error message like “A Material is using the texture as a normal map”, just click “Fix now”.
  20. Click on the model, then in the Inspector window, click on Rig. Choose Animation Type to be “Humanoid”. Click Apply.
  21. Staying in the Inspector window, click on Materials. Choose Material Creation Mode to be “Standard (Legacy)”, choose Location to be “Use External Materials (Legacy)”, and leave the other options at their defaults (Naming as “By Base Texture Name” and Search as “Recursive-Up”). Click Apply.
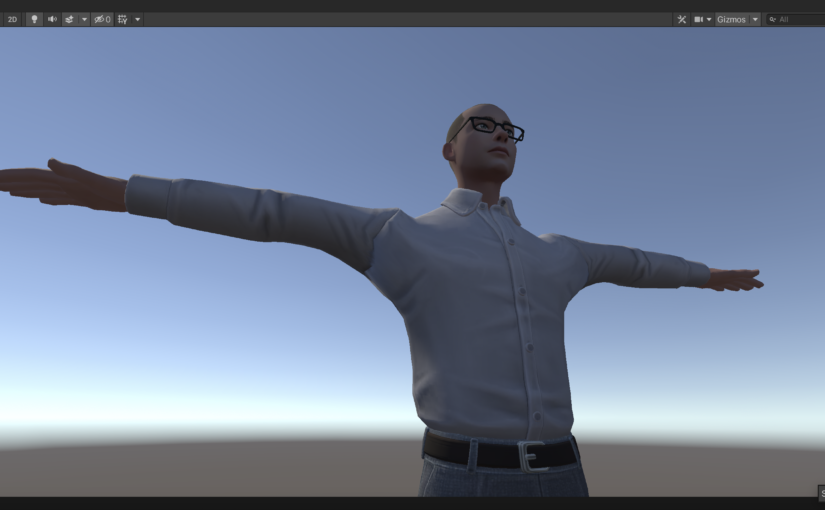
  22. Drag the model from Assets into the Scene.
  23. If your model is meant to look like an anime figure, do this step, but otherwise (e.g. for more realistic avatars) skip it. Expand the newly created avatar in the Hierarchy window, and for each Material listed (which should be everything but Armature), click on it, then scroll down in the Inspector to the Shader. Click on the Shader drop-down (it may say something like “Standard”) and change it to VRM > MToon. Do this for all the materials in the model.
    Screenshot of Unity showing where to change the material Shader
  24. Alternatively, you can do other tweaks to the materials at this point. I find Unity makes the textures look a little grey, so this can be corrected by going into each Material as described in the previous step, opening up the Shader and changing the colour next to Albedo to use Hexadecimal FFFFFF (instead of CCCCCC). This is completely optional though.
  25. Click on the avatar in the Hierarchy window, and then in the VRM0 top-level menu of Unity, select Export to VRM 0.x resulting in the export window popping up.
    Screenshot of Unity showing the VRM export window
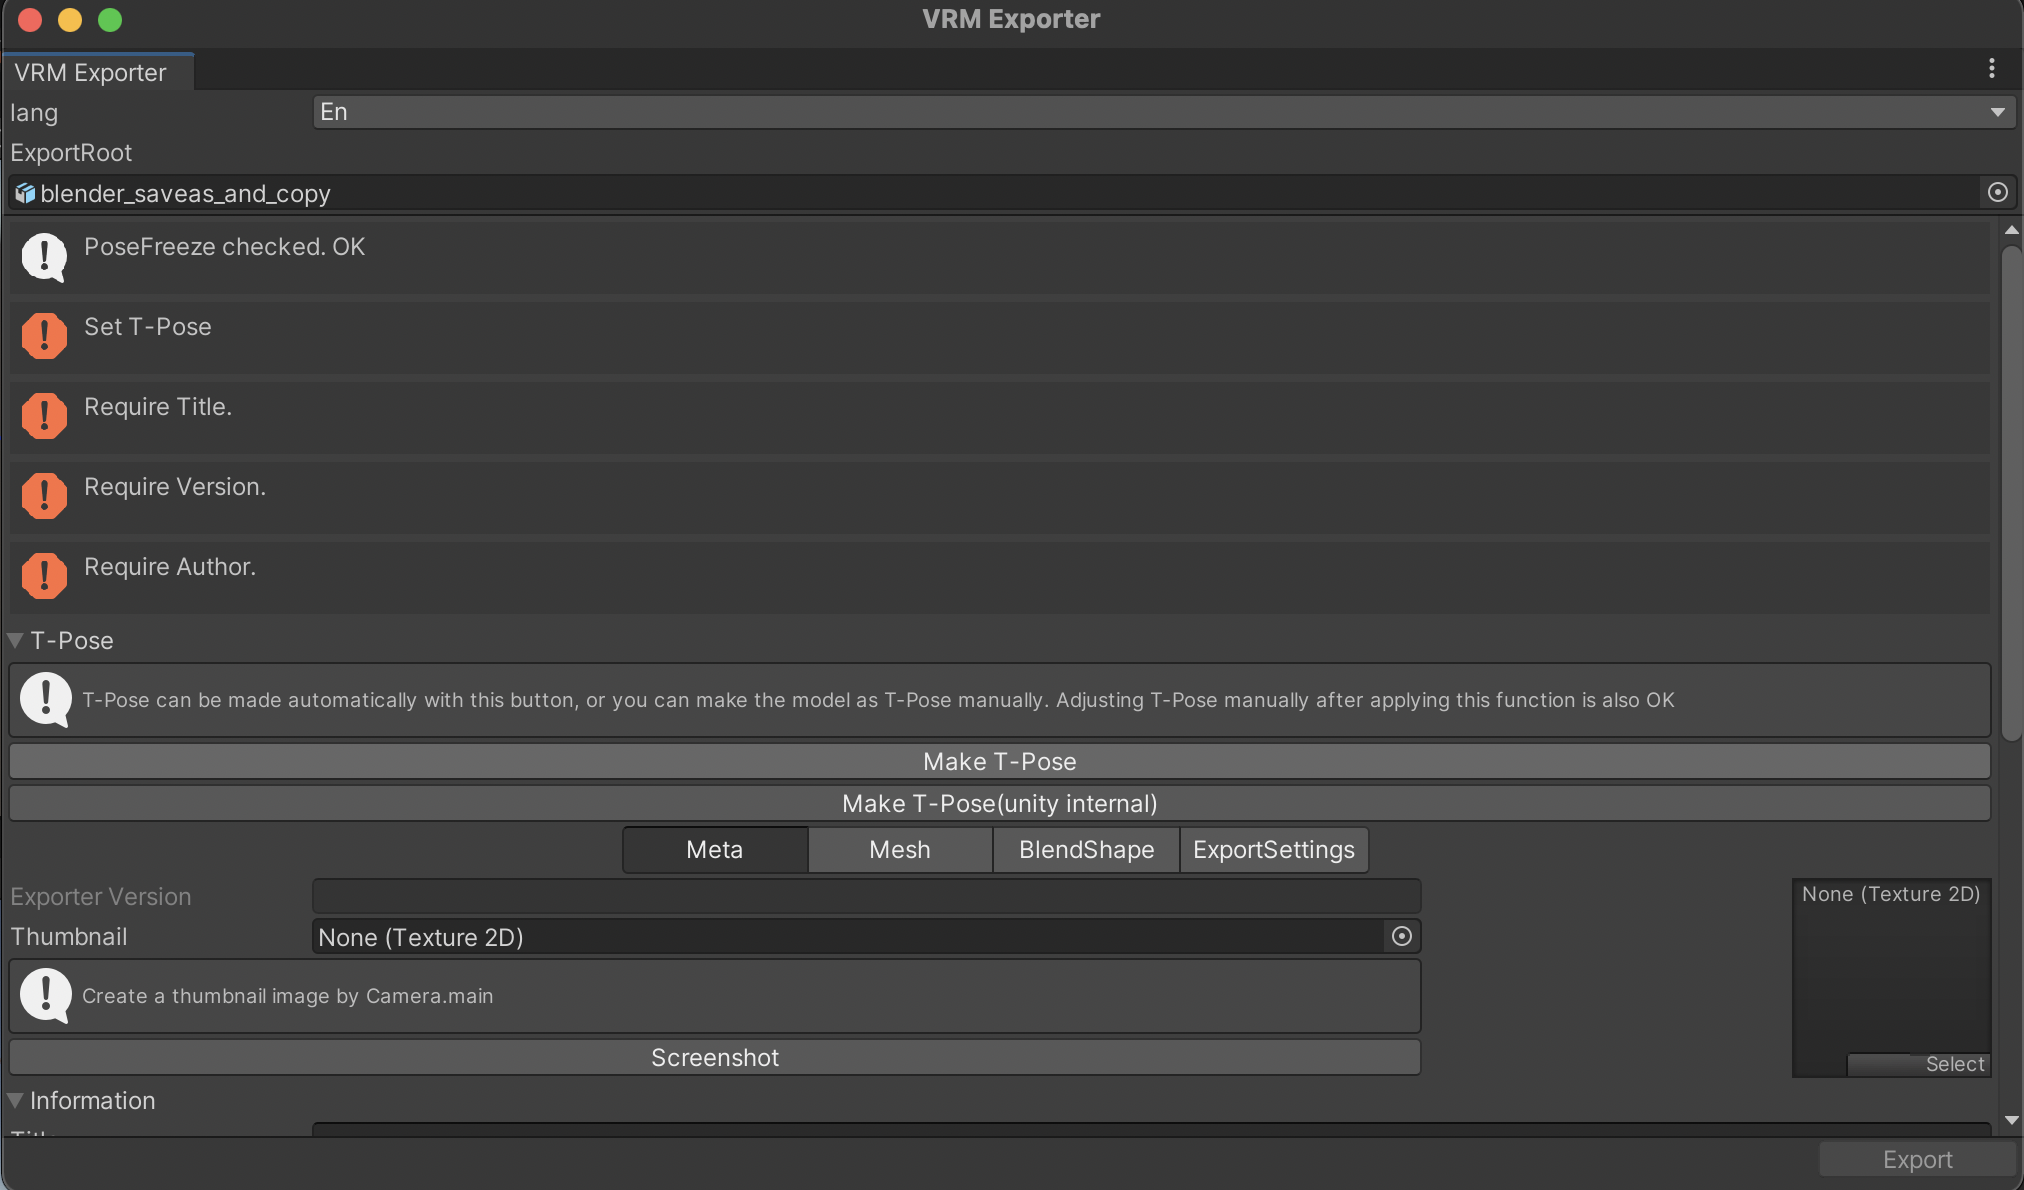
  26. Click on “Make T-Pose”. Scroll down a bit and enter a Title (ie. the name of your avatar), a version (e.g. 1.0) and the Author (i.e. your name). Then click Export. Choose a name like “avatar” and save the VRM file into your vrm_assets folder.
  27. Delete the avatar that you just exported from the Scene by right-clicking it in the Hierarchy and choosing Delete. This just keeps the Scene neat for later.
  28. Now, drag the newly-saved VRM file into the Assets window of your Unity project. It is time to configure the lip synch and facial expressions.
  29. Double-click on the BlendShapes asset (if you had saved the VRM file as avatar.vrm, this asset will be called avatar.BlendShapes) to show all the expressions that can be configured. Clicking on BlendShape will allow you to easily see and configure them in one place.
    Screenshot of Unity showing the configuration of Blend Shape
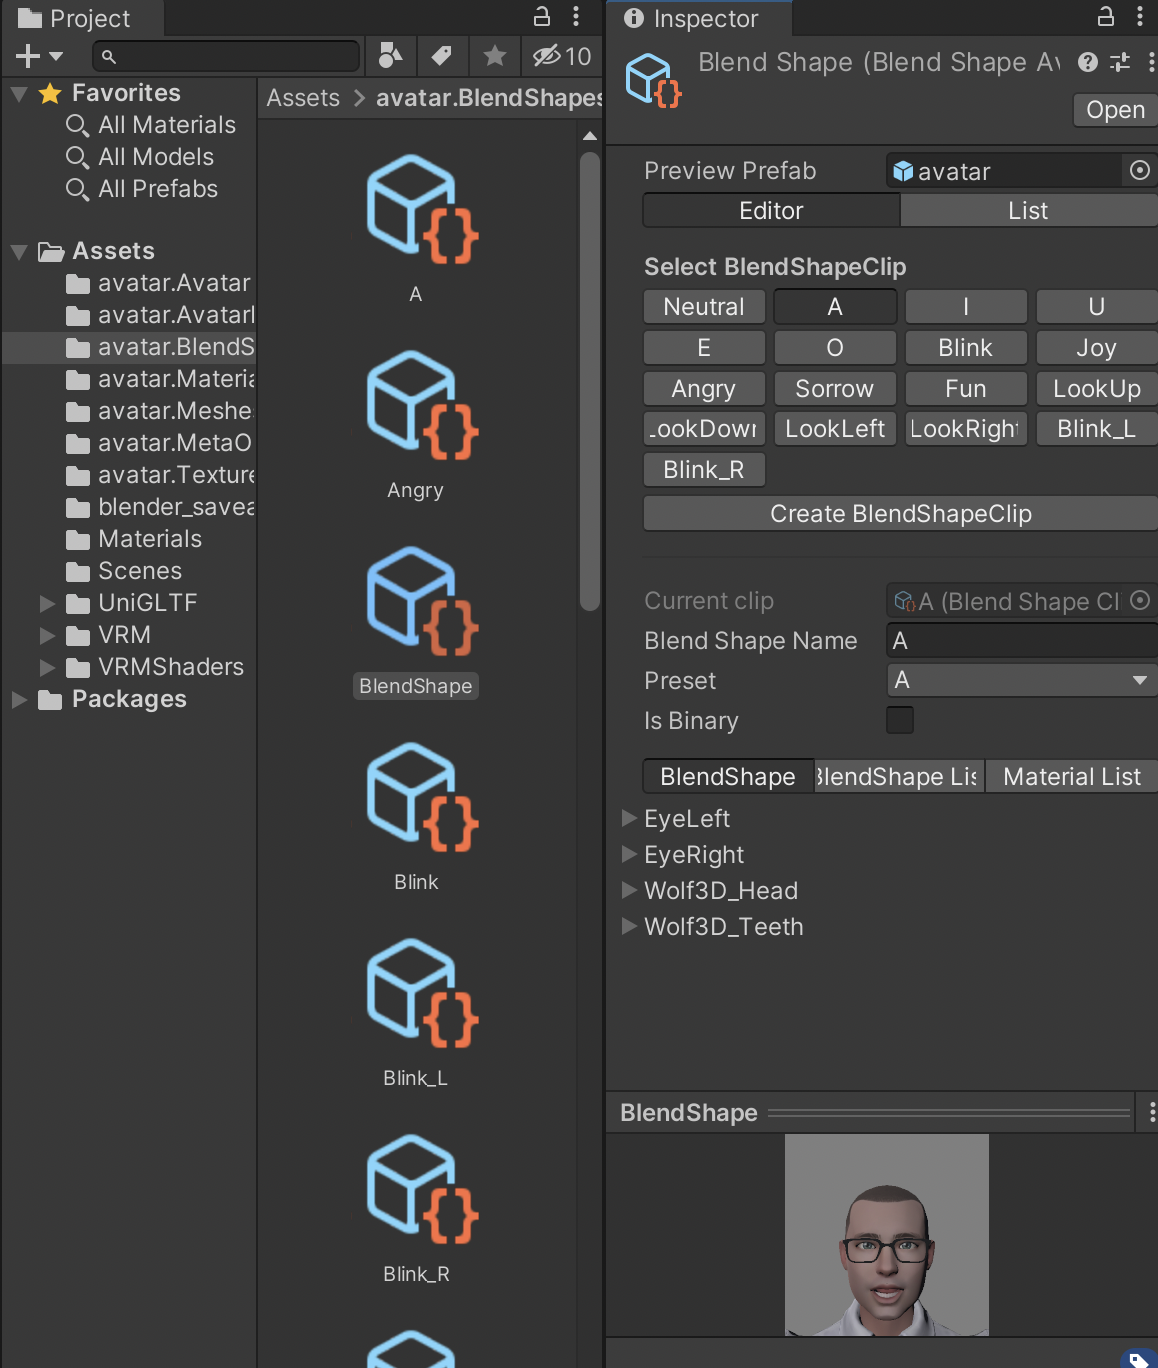
    Configuring the vowels will allow lip synch to work with your avatar, but you should configure all of it to ensure your avatar doesn’t look too wooden. Note that the vowels are in the Japanese order: A, I, U, E, O. Here are the settings that I used, but different avatars will need different values.
    • A:
      • Wolf3D_Head.viseme_aa 100
      • Wolf3D_Teeth.viseme_aa 100
    • I:
      • Wolf3D_Head.viseme_I 100
    • U:
      • Wolf3D_Head.viseme_U 100
    • E:
      • Wolf3D_Head.viseme_E 100
      • Wolf3D_Teeth.viseme_E 30
    • O:
      • Wolf3D_Head.viseme_O 100
      • Wolf3D_Teeth.viseme_O 100
      • Wolf3D_Teeth.mouthOpen 15
    • Blink:
      • Wolf3D_Head.eyesClosed 100
    • Joy:
      • Wolf3D_Head.mouthOpen 60
      • Wolf3D_Head.mouthSmile 48
      • Wolf3D_Head.browInnerUp 11
    • Angry:
      • Wolf3D_Head.mouthFrownLeft 65
      • Wolf3D_Head.mouthFrownRight 65
      • Wolf3D_Head.browDownLeft 20
      • Wolf3D_Head.browDownRight 20
    • Sorrow:
      • Wolf3D_Head.mouthOpen 60
      • Wolf3D_Head.mouthFrownLeft 50
      • Wolf3D_Head.mouthFrownRight 50
      • Wolf3D_Teeth.mouthOpen 30
    • Fun:
      • Wolf3D_Head.mouthSmile 50
    • LookUp:
      • EyeLeft.eyesLookUp 36
      • EyeRight.eyesLookUp 36
      • Wolf3D_Head.eyeLookUpLeft 75
      • Wolf3D_Head.eyeLookUpRight 75
    • LookDown:
      • EyeLeft.eyesLookDown 40
      • EyeRight.eyesLookDown 40
      • Wolf3D_Head.eyeLookDownLeft 20
      • Wolf3D_Head.eyeLookDownRight 20
    • LookLeft:
      • EyeLeft.eyeLookOutLeft 67
      • EyeRight.eyeLookInRight 41
    • LookRight:
      • EyeLeft.eyeLookInLeft 41
      • EyeRight.eyeLookOutRight 67
    • Blink_L:
      • Wolf3D_Head.eyeBlinkLeft 100
    • Blink_R:
      • Wolf3D_Head.eyeBlinkRight 100
  30. Now go back to the top level of the Assets window and scroll down to the avatar VRM model, then drag it into the Scene.
  31. Just as before, in the VRM0 top-level menu of Unity, select Export to VRM 0.x. You can leave the fields as they are, or update then. Click on Export. Save your VRM file into your vrm_assets folder with a new name to reflect it now has the expressions configured.
  32. Quit and save Unity, in case you want to come back and make further tweaks. You now have a VRM model.

Test out the VRM file in the avatar application of your choice! Good luck.

Gluten-free Pancakes Recipe

This is something I make regularly, and just like I previously recorded my Pancakes Recipe here, I’m recording my GF Pancakes Recipe here to make it easy to refer back to. It is originally based on Elizabeth Barbone’s excellent GF Pancakes Recipe.

Ingredients

  • 115g white rice flour
  • 60g corn flour
  • 60g sticky rice flour (a.k.a sweet rice flour a.k.a. glutinous rice flour)
  • 60g caster sugar
  • 15mL baking powder
  • 1/2 teaspoon table salt
  • 1/4 teaspoon xanthan gum
  • 2 large eggs
  • 1 cup (250mL) whole milk, or a little less
  • 1/4 cup (60mL) vegetable oil, or similar, e.g. canola oil
  • 1 teaspoon vanilla extract

Method

  1. Sift all the dry ingredients (flours, sugar, salt, baking powder and xanthan gum) into a mixing bowl, and stir with a fork to combine.
  2. Crack the eggs into a glass, stir with a fork, and add to the mixing bowl, together with half (!) the milk, and all the other wet ingredients. Stir with a fork to make a thick mixture, and keep stirring briskly until it is smooth.
  3. Gradually add more milk, stirring each time, until the batter pours smoothly, and is the consistency of a milkshake. You may not need all of the milk.
  4. Heat up a flat frying pan on a low-to-medium heat, and spread with a little butter. It should sizzle when hot enough. Don’t let it get so hot that the butter burns.
  5. Use a 1/4 cup measure to scoop the pancake batter onto the frying pan. I use silicon egg rings to help form the pancakes into a consistent round shape. When bubbles just start to form on the top, I remove the rings and gently flip the pancakes, and cook until it is browned on both sides.
  6. If you keep them in a stack as you take them out of the frying pan, they tend to stay warm longer. That is, if they aren’t immediately eaten.
  7. Serve with maple syrup and sliced banana, or whatever takes your fancy!

Makes about 10 pancakes.

Turning up for work as an avatar

I don’t think we’re talking enough about avatars. I don’t mean the James Cameron film or the classic anime series. I’m referring to the computer 3D model that can represent you online, instead of a picture or video of the “real you”.

Due to the Covid-19 pandemic, we’ve had something like 5 years of technology uptake in an accelerated timeframe. Remote working has become much more common, with people regularly joining meetings with colleagues or stakeholders via services like Teams, Webex or Zoom rather than meeting up in person.

While pointing a camera at your face and also seeing an array of boxes containing other people’s faces has its merits, it can have a bunch of downsides. It turns out that many of these can be addressed by attending the meeting as an avatar rather via camera.

Interacting with others via avatars is the normal way of things when it comes to computer games. Many people are familiar with avatars from online social settings like Minecraft, Fortnite or Roblox. I’d think that for many kids today, they have spent more hours interacting online with others as an avatar than on camera.

So, it may be there is a generational shift coming as such people come up through our Universities and workplaces. But there are also fair reasons for moving to use avatars for meetings in any case. Here are five reasons why you should consider turning up for work online as an avatar.

1. It’s less stress

Being on camera can be a bit stressful, since your appearance is broadcast to all the other people in the same meeting, and other people can be a bit judgy. Why should your appearance be the concern of people that don’t need to share the same physical space as you?

If you attend a meeting as an avatar, you

  • Don’t have to shave, brush hair, put on makeup
  • Don’t have to worry about a pimple outbreak, or a bad haircut
  • Don’t have to get out of pyjamas, take off a beanie, or cover up a tattoo
  • Know there’s no chance of someone embarrassing wandering past in the background or a pet leaping up in front of you

2. You will appear more engaged

Well, if having the camera on is stressful, why not just turn it off? In some workplaces or schools, it is considered bad etiquette to turn off your camera in a group video call. It is not a great experience to be talking to a screen of black boxes and not seeing anything of your audience. Seeing a participant’s avatar watching back instead of a black box is a definite improvement.

However, sometimes it is a good idea to turn off the camera, such as when eating or having to visit the bathroom. The participant is still engaged in the meeting but for good reasons has turned off the camera. There is no need to do that with an avatar.

An avatar is also able to make eye contact through the meeting. Unfortunately, not everyone with a camera can do this, as the camera position might be to the side, above or below the screen that the participant is actually looking at. This tends to make the participant look distracted, as that would be how such behaviour would be interpreted in a face-to-face meeting. Avatars don’t have this issue.

3. Avatars are more fun

With Teams, Webex or Zoom, you can replace your background with a virtual background for a bit of fun. With an avatar, you can change everything about your look, and make these changes throughout the day.

You don’t even need to be human, or even a living creature. You might want to stick to an avatar that is at least humanoid and has a face, but there’s a huge creative space to work within.

In some online services, avatars are not limited to being displayed in a box (like your camera feed is), but can interact in a 3D space with other avatars. This also means that stereo audio can be used to help position the avatar in a physical space, making it easier to tell who is speaking by just where the sound is coming from, or distinguish a speaker when someone is talking over the top of them.

4. There may be less risk of health issues

Most group video meeting services show a live feed of your own camera during the call. It’s not exactly natural to spend hours of a day looking at yourself in a mirror, especially if the picture of you is (most likely) badly lit, from an odd or unflattering angle, and with a cheap camera lens. Then, if you couple this with seeing amazing pictures of others online, say on social media, it all appears to be a bit unhealthy.

While it’s not an official condition, there is some discussion about what is being called Zoom dysmorphia, where people struggle to cope due to anxiety about how they appear online. These people may go the plastic surgery route in order to deal with this.

Having a camera on all the time may also be generally unhealthy since it ties people to the desk for the duration of the call. Without this, for some meetings, people might instead take a call while walking the dog or taking a stroll around the block.

5. It works well for hybrid meetings

Hybrid is hard. It’s typically not a level playing field to have some meeting participants together in a room and some joining remotely. Having a camera at the front of a room capturing all of the in-person attendees means it is often difficult for the remote participants to see them.

The main alternative is that all the participants in the room have a device in front of them that allows them to join the meeting as a bunch of remote participants who happen to be in the same place. This usually results in a bunch of cameras pointing up people’s noses, as the cameras in a laptop or tablet are not at eye-level.

If the people in the room join as avatars, they can be showed nicely to the other participants, and the individuals’ cameras are often still adequate for animating their avatar to track with their face and body.

However

There are some down-sides to using avatars. It can make it more difficult for hard-of-hearing participants since they can’t rely on lip reading to follow a conversation. There will need to be avatar etiquette discussions so people aren’t made uncomfortable by certain types of avatar turning up to meetings. The technology is still evolving so it can look a bit unnerving if an avatar doesn’t show expected human emotions.

But directionally, avatars solve problems with our current group video meetings, and we can expect to see them become more mainstream over the coming years.

What is a qubit?

I am not a deep expert in quantum computing, but I know several who are. In order to chat to them, I have read quite a few introductory quantum computing articles or online courses. However, I find that these are either pitched at a level where it’s all about the hype, or at a level where you need to have a good background in either mathematics or physics to follow along. So, I have been trying to describe a quantum computer in a useful way to people without the technical background.

This is just such an attempt. If you’re still with me, I hope you find this useful. This is for people that don’t know the difference between Hamiltonians, Hermitians or Hilbert spaces, and aren’t planning to learn.

Let’s start with some definitions. A quantum computer is a type of computing machine that uses qubits to perform its calculations. But this raises the question of what is a qubit?

Digital, or classical, computers use bits to perform their calculations. They run software (applications, operating systems, etc.) that run on hardware (CPUs, disk drives, etc.) that are based on bits, which can be either 0 or 1. The hardware implementation of these bits might be based on magnetised dots on plastic tape, pulses of light, electric current on a wire, or many others.

Qubits are “quantum bits”, and also have a variety of hardware implementations such as photon polarisation, electron spin, or again many others. Any quantum mechanical system that can be in two distinct states might be used to implement a qubit. We can exploit the properties of quantum physics to allow a quantum computer to perform calculations on qubits that aren’t possible on bits.

Before we get to that, it is worth noting that quantum computers are known to be able to perform certain calculations in minutes that even a powerful classical computer could not complete in thousands of years. For these specialised calculations, the incredible speed-up in processing time is why quantum computers are so promising. As a result, quantum computers look to revolutionise many fields from materials engineering to cyber security.

Since a qubit can be made from a variety of two-state quantum systems, let’s consider an analogy where we implement a qubit on something we all have experience with: a coin. (I know this is not an exact analogy since a coin is a classical system not a quantum mechanical system, and it can’t actually implement entanglement or complex amplitudes, but it’s just an analogy so I’m not worried.)

If we consider a coin lying on a table, it can be either heads-up or heads-down (also known as tails). For the purposes of this analogy, let’s call these states 1 and 0. You will recognise that this is like a classical bit.

Maybe this coin has different types of metals on each side, so we could send some kind of electromagnetic pulse at it to cause it to flip over, and this way we could change it from 1 to 0, or visa versa. If there is another coin next to it, we might consider another kind of electromagnetic pulse that reflects off only one of those metals in a way that would flip the adjacent coin if the first coin’s 1 side was up. You might ultimately be able to build a digital computer of sorts on these bits. (You can build a working digital computer within the game of Minecraft, so anything’s possible.)

Let’s now expand our analogy and add a coin flipping robot arm. It is calibrated to send a coin up into the air and land it on the table, such that it always lands with the 0 side up. While the coins are in the air, these are our qubits. When they land on the table, they become bits.

Now we can flip coins into the air, and send electromagnetic pulses at them to change their state. However, unlike bits that can be only either 0 or 1, qubits have probabilities. A pulse at a coin can send it spinning quickly so that when it lands on the table it will be either 0 or 1 with a 50-50 chance. Another pulse might reflect off this spinning coin so that it hits the next coin and spins it only if the pulse happens to hit the 1 side of the first coin. Now when the coins land, they have a 50-50 chance of either being both 0 or both 1.

However, you won’t know this from measuring it just the one time. You will want to perform the coin flips and the same electromagnetic pulses a hundred times or more and measure the number of different results you get. If you do the experiment 200 times, and 100 of those times you get two 0s and the other 100 times you get two 1s, you can be pretty confident that this is what is going on. For more complicated arrangements of pulses, and greater numbers of coins, you might want to do the experiment 1000 times to have a clear idea of what is happening.

This is how quantum computing works. You perform manipulations on qubits (coins in the air), these set up different possible results with different probabilities, the qubits become bits (coins on the table) that can then be read and manipulated by a classical computer, and you repeat it all many times so you can determine things about those probabilities.

Gluten-free Donuts (or Doughnuts)

I like ’em, whether they are called donuts or doughnuts, especially when they are fried, ring-shaped, and covered with a cinnamon-and-sugar powder. I recently impulse-bought a donut maker – one of the kinds that drops rings of batter into hot oil – and was looking forward to making some of my favourite kind.

However, when I went to search for a gluten-free, fried ring donut recipe, I couldn’t actually find one. I checked my trusty gluten-free recipe books and did several versions of web searches, but I didn’t find what I was looking for. I did discover some interesting yeasted donut recipes that I have put aside to try another time, though.

So, after a bit of experimentation, here is my recipe for gluten-free, fried ring donuts. It was based on this recipe for gluten-and-dairy free donuts that was pretty similar to the (glutinous) one on the box of the donut maker, but was for oven-baked donuts rather than fried ones.

Before you begin

bottom outlet of a plastic donut maker showing the rod centred in the middle of the outlet

It is important to ensure your donut maker is going to work for you. Perhaps I can’t be too fussy about a $13 donut maker, but it still needs to work. After it arrived, mine needed to be gently adjusted by pushing the internal component to re-seat itself in the plastic channels. Also, the plastic rod was a little warped, so when I pressed down on the top of the donut maker, the plastic rod – that ultimately forms the “hole” in the final donut – wasn’t centred correctly. I needed to spin the rod in place until when I pressed the button at the top, the rod stayed centred in the circular outlet at the bottom of the donut maker. I then used a permanent marker on the button at the top of the rod and the outer rim of the donut maker to help show me where it needed to stay aligned to for a good donut shape to be created.

three donuts in a frypan on a bbq with a bbq thermometer reading the oil temperature as 171 degrees Celcius

You also want to be able to control your oil temperature. For me, I used a BBQ thermometer and heated the oil in a frypan outside (to keep the hot oil smell out of the house). I could then control the oil temperature by either raising/lowering the lid of the BBQ or adjusting the gas setting. Around 180 degrees Celcius is the best temperature to fry your donuts, so ensure you can manage that +/- 10 degrees. A thermometer of some kind is highly recommended!

Ingredients

  • 140 g of gluten-free plain flour (a type with no xanthan gum)
  • 1/2 teaspoon (2.5 mL) of xanthan gum
  • 1 teaspoon (5 mL) of gluten-free baking powder
  • 1/2 teaspoon (2.5 mL) of table salt
  • 50 g of caster sugar
  • 1 teaspoon (5 mL) of ground cinnamon
  • 1 large egg
  • 1 teaspoon (5 mL) of vanilla extract
  • 80 mL of canola (or vegetable) oil
  • 175 mL of milk
  • 1 teaspoon (5 mL) of vinegar
  • At least 1 L of canola oil, or other suitable oil, for frying
  • Extra caster sugar and ground cinnamon for coating

Method

  1. Heat up the oil for frying, but keep an eye on it that it doesn’t get too hot.
  2. Sieve the dry ingredients into a large mixing bowl, and then combine well with a fork.
  3. Lightly beat the egg, and then add it and the other wet ingredients into the same mixing bowl. Beat until smooth, and then scrape into the donut maker.
  4. When oil is at temperature (near to 180 degrees Celcius), begin using the donut maker. Hold it just above the oil and press down on the button. The mix will be quite thick, but gently shake the donut maker and after about 5 seconds, there should be a good quantity of donut mix held at the end of the donut maker. Release the button and it should cut the mix away from the donut maker to drop a nicely-shaped ring of batter into the hot oil. Cook a batch of donuts together, maybe 3 or 4, or more depending on the size of your frypan or pot.
  5. Let the donuts cook for a couple of minutes, and then using a slotted metal spoon (or a potato masher in my case), gently turn the donuts over to cook for a couple more minutes. When they are done they should be a dark golden colour.
  6. Remove the batch of donuts to a plate covered with paper towel, allowing you to start another batch of donuts.
  7. Toss the cooked donuts in a mix of caster sugar and cinnamon (maybe 1 teaspoon of cinnamon to 50 g of caster sugar, but do whatever you feel tastes best), and then move to a cooling rack or plate.
  8. As with most gluten-free baking, these donuts will taste best when you’ve allowed them to cool to room temperature. It can be very tempting to eat them while they are still warm, but they will taste like they are undercooked at that point, sorry.

Makes 20 or so 6 cm-diameter donuts.

Pandemic Life

Over the past couple of years, we’ve all experienced the impacts of pandemic-related restrictions. These changes to how we live, learn and work have been with the goal of protecting society, but they have been severe at times. Here in Melbourne, where I live, we had perhaps the longest time in lockdown experienced anywhere.

Now that we have sufficient vaccinations, tests and treatments to manage Covid-19, it looks like we might be coming out of the pandemic. Before I forget what the last couple of years were like, I wanted to record here some of what our daily experience was. In particular, what we did in order to get through those long lockdown months.

I didn’t want to share this earlier, as I’m aware that many people were just trying to get through the days. Having a list of what we did in our household might have added pressure to others. There was no one way of doing lockdown right. Whatever got you through to the end of the day, and to the end of the week, was sufficient.

Work

My wife and I were both working remotely in lockdown. We immediately converted the spare bedroom / junk room into a study and set up desks for each of us there. This very quickly became frustrating with both of us trying to do video meetings out of the same space at the same time. My wife moved into one of the living areas, converting half of it into an office, and this worked a lot better.

Having a separate space for work and non-work was helpful for when trying to “switch off” at the end of the work day. In addition, I continued to wear work clothes for work, and casual clothes for when work was done, aiding with compartmentalisation. However, I soon switched from trousers to comfy jeans. If it isn’t on camera, it doesn’t count.

Part of the daily starting work routine was collecting a coffee from the local coffee shop. While it’s just a small spend, we also felt we were doing a little bit to help a local business get through lockdown. A benefit was that I ended up getting to know a bunch of the staff there by name, and continue to go there still.

I set up a networked printer server on our old laser printer so everyone could print what they needed from whatever device they were using, as well as an Internet monitor display that could show when the Internet connection was down or behaving poorly. There were a lot of shouted questions about “is your Internet still working?” while we were in lockdown.

Health

Lockdown wasn’t exactly healthy for anyone. I had been doing Body Pump classes at a local gym, and in lockdown there wasn’t even the exercise of walking to a train station or walking between meeting rooms. I got a floor mat and some hand weights, and ended up doing Body Pump-style exercises to random Spotify music 2-3 times a week in the mornings. Even now that lockdown is over, I’ve continued this practice.

As a family, we tried to find exercise we could do together (within our 5 km limit). Initially we looked at the Joe Wicks videos but we didn’t really have the space to do it, and the kids launched a protest as well. So, we ended up doing family bike rides at lunch time. Unfortunately, the association with lockdown has tainted family bike rides in the neighbourhood since then. Still, the kids became really decent riders.

Another nice thing about the rides was that we got to know the neighbourhood better. We’d moved to the area just a couple of months before lockdown, so there was plenty to explore. Also, during one of the lockdown periods, people would put teddy bears in their windows and it was fun to spot them. We also had a bit of a bear arrangement for a while on our verandah.

A downside to the bike rides was that we had to leave the dog behind, which she didn’t like. She was a bit of an escape artist, and I had an ongoing project to fit things to our fence so she wouldn’t be able to climb over it. A complication is that we were renting, so couldn’t attach anything permanently. In the end, I attached some planks to the top of the fence with wire and this was sufficient to prevent her going up and over.

When it came to mental health, the Headspace app got heavily used and we signed up to a family plan. It was my first time I’d stuck with a meditation program, and it was very useful in managing the level of stress.

Education

The kids were both at primary school in the first year, then one went up to high school in the second year. Remote learning in general worked pretty well.

When both were in primary school, they would typically finish off all their learning by the morning, and then amuse themselves in the afternoon, outside of any specialist class meetings. They shared different ends of the dining table, and this was also good for Wi-Fi connectivity. We insisted that they have cameras on for their video meetings, and it seems this was a bit unusual. It did give us an argument for why they needed to be dressed by 9am though.

Their schools did a good job in implementing remote learning for lockdown, but remote socialising was not a focus for schools. We had a virtual substitute for the classroom but not for the playground. Our kids could play with each other a bit, but when the eldest went up to high school, this no longer worked.

Eventually, the parents of the kids in the primary school class were able to join everyone to Discord, and this became the means for them to stay in social contact. It would have been better to have a more age-appropriate solution, but this was the best we could arrange, and the benefits of ongoing social contact outweighed the disadvantages.

The schools used Compass to communicate with parents, and it was a big step up from the level of communication we had before lockdown. Unfortunately, Compass has a number of very annoying quirks, and I ended up developing a script to process the Compass email alerts and turn them into a readable message instead of a message to click a link to a message that later disappears.

As well as the individual classes, we also got into a routine of watching BTN and Science Max together as a family. There was also a little bit of Mark Rober thrown in for good measure.

The school lunch break was able to coincide with the parents’ lunch break, and so we tried to all spend time together at that point, if only for 30 mins. We ended up designating one bedroom as the “lunch room”, since it was a different space from the ones we were working and learning in.

Friends and Family

Many regular evening and weekend activities couldn’t work as normal under lockdown. My local orchestra’s rehearsals and performances couldn’t go ahead, and it switched to a fortnightly online orchestra social get-together instead, with a mix of quiz nights, celebrity interviews and Acapella app selfie-performances.

My monthly friendly dinner party club shifted to a mode where we agreed on a theme and then all cooked it at home for our families and households, but ate together via Zoom, Webex, or Teams. Not quite the same, and having to cook food that the kids would also eat meant it was less adventurous, but still a bit of fun.

The book clubs I was involved in also went online, but there was a bit of a drop-off in attendance. There was definitely a bit of Zoom fatigue going on, and it was hard to be motivated to read serious books when there was enough other serious things to worry about.

The Melbourne-based part of our extended family were unfortunately outside our 5km limit, but we kept in touch with them with weekly video sessions. Plus there were other regular catch ups with friends.

A new weekly tradition was joining a couple of friends virtually for Locked Down Trivia, which raised money for good causes, and gave us a good excuse to try out a variety of cocktails. Some people there got into dress-ups and group challenges, but we were there for the laughs. And possibly to test our ability to confirm our knowledge via Google.

Hobbies

Just like everyone else it seems, we started doing jigsaw puzzles. There was generally a puzzle set up somewhere, and anyone could come past and work on it for a bit if they needed to distract themselves or reset.

We started a weekly tradition of big Sunday lunches. Initially it was Sunday roasts, but it didn’t take too long to widen it to a broader set of cuisines. I remember we did a big dish of lasagne a couple of times and also crepes one day.

I was one lockdown behind the trend in some of my hobbies, and after it boomed in Lockdown 1, I took up sourdough baking in Lockdown 2. I’ve posted before on this blog about my adventures in gluten-free sourdough, and I’m pleased to say that my sourdough starter is still alive!

Also on food, we ordered a few minor luxuries to treat ourselves from time to time. We brought in nice tea from Tea Leaves in Sassafras, nice chocolate from Haighs, and nice gin from all over the place. Occasionally, we’d order a nice dinner to be delivered, doing this at the same time as some friends, and we could have a virtual dinner party together.

The kids found their own ways to cope, and the tough times resulted in an unexpected burst of creativity. There was a lot of Lego building, and we went through a lot of craft kits. In addition, for a few months they made a weekly newspaper called Big House News that chronicled the more dramatic events in the house, as well as poking fun at their parents. There was also a series of stop motion animation videos produced and shared with remote family members. Looking back, some of the videos had rather dark humour, but they were at least all humorous.

We also experimented with playing Dungeons & Dragons. I got out my old AD&D 2nd Edition books and over successive weekends, we ran through a short campaign. It all went a bit silly and we had lots of laughs.

I’d be remiss not to mention the heavy use that the PlayStation 4 got during lockdown, and then the PlayStation 5 (once we could get our hands on one). I think we now own every expansion pack for The Sims 4, and I spent a lot of time in action RPGs like Witcher 3, God of War, and Assassins Creed Valhalla.

Other Stuff

We were forced to switch to ordering our shopping online for home delivery. We had tried this a few years back and stopped after having issues like missing items or strange substitutions. Apparently these are still issues.

With widespread panic buying affecting supermarket shopping, we switched to buying toilet paper on subscription. Happily, gluten-free varieties of products tended to be less affected by panic buying. For some reason, gluten-free pasta and gluten-free flour are not what doomsday preppers want to keep in their stash.

Although, one prepper move we made was to ensure we had at least half a tank of fuel in the car, and at least half a bottle of gas for the BBQ on hand. Pandemic restrictions were randomly hitting different industries, and it was hard to predict which supply chain would be the next to be disrupted.

But let’s hope we don’t have to do all this again.

First word of Wordle

In the last week, I have started playing the online word game Wordle by Josh Wardle. I was lured in after getting curious about some strange Twitter status updates that showed rows of green, grey and yellow blocks. It turns out it’s a fun game, too.

The basic idea is to try to guess a five-letter word, and you get six guesses. Each day there is a new word, and everyone gets to guess the same one. After each guess (which must be an actual word), you get some information on how close the guess was because the letters in a guess are shown as green (correct letter in correct position), yellow (correct letter in incorrect position) or grey (incorrect letter). After you’ve finished guessing the word, you can share a status update that shows how well you went, in a way that doesn’t give away any information about the word. That’s what I was seeing on Twitter.

I’ve done it four times now, and a natural question is what word should be the first guess. At that point in time, there is no information about the daily word, so it makes sense to me that the first guess should be the same each day. However, what is the best word to use for that first guess?

The conclusion I’ve reached is that the best word should have five different letters, together which are the top five most likely letters to match in a word, i.e. maximise the chance of getting yellows. Additionally, those letters should ideally be in a position that is most likely to match the correct position, i.e. maximise the chance of getting greens.

To figure this out properly, I would need to know the word list being used by Wordle, which unfortunately I don’t. In fact, there may be two word lists: the word list used to allow guesses, and the word list used to pick the daily word. So, I’ll make a big assumption and use the Collins Scrabble Words from July 2019.

My tool of choice is going to be zsh on my MacBook Air. It doesn’t require anything sophisticated. Also, I’ve removed any extra headers from my word list, and run it through dos2unix to ensure proper end-of-line treatment.

First job is to extract just the 5 letter words:

% grep '^.....$' words.txt > words5.txt
%

Now we need to figure out how many words each letter of alphabet appears in:

% for letter in {A..Z}
for> do
for> echo $letter:`grep -c -i $letter words5.txt`
for> done | sort -t : -k 2 -n -r | head -n 10
S:5936
E:5705
A:5330
O:3911
R:3909
I:3589
L:3114
T:3033
N:2787
U:2436
%

That wasn’t very efficient, but it doesn’t need to be. We have our answer – the most popular letters are S, E, A, O and R. Putting these letters into a free, online anagram tool, it turns out that there are three words made up from these letters: AEROS, AROSE and SOARE.

Okay, so while only one of these is a word that you’d actually use, it turns out that Wordle accepts them all. It looks like Wordle might use the Scrabble word list for its guesses.

In any case, this looks like a pretty good set of letters, as the words in the word list are highly likely to have one of these letters:

% grep -c . words5.txt
12972
% grep -c -i -e A -e R -e O -e S -e E words5.txt
12395
%

Of the 12,972 words in the word list, 12,395 (96%) will have at least one letter match!

The next job is to figure out which of these three words is most likely to have letters in the same position as other words in the word list.

% grep -c -e A.... -e .E... -e ..R.. -e ...O. -e ....S words5.txt 
6578
% grep -c -e A.... -e .R... -e ..O.. -e ...S. -e ....E words5.txt
3742
% grep -c -e S.... -e .O... -e ..A.. -e ...R. -e ....E words5.txt
5726
%

We have a winner! A letter in AEROS is in the right position for 6,578 words (51%).

So, it looks like using AEROS as your first guess in Wordle is a pretty good choice. Just, don’t tell anyone that’s what you’re doing, or if you share the standard Wordle status update, it will actually contain spoilers.

Gluten-free Sourdough Bread

Just before Melbourne went into Covid-related lockdown for the fifth time, I joined a gluten-free sourdough bread-making class at a nearby cafe. Their chef, Dom Marzano, shared tips on how to bake a tasty, white, gluten-free sourdough loaf just like they sell in the cafe. I found that their recipe worked just as well with my sourdough starter – a revelation! The secret to achieving a great loaf was not to use a special sourdough starter, but simply use the right flour mix. In this case, the flour mix is the Well & Good Crusty Bread Mix, which sells for about $6 for a 410g pack.

Many gluten-free sourdough bread recipes that I’ve come across require a few exotic flours, so $6 to bake a loaf is reasonable. The Well & Good flour mix magic seems to come from its particular combination of thickeners, which include usual suspects like xanthan gum, guar gum and psyllium husk, plus some others. They’ve done the science to figure out how to make gluten free flours behave like wheat flour, and now I don’t have to.

I maintain a sourdough starter at just 60g, so the recipe below starts from this basis and explains how to build it up and then turn it into a loaf of bread over four days, ready to eat on the morning of the fifth day. It slices up pretty well, so I would say it’s worth the wait!

In the instructions below, I use normal Melbourne tap water (not any warmer than a tepid temperature). If you’re in another region, you may prefer to use bottled water, or boil and then cool tap water instead. Also, I use a half-half mix of brown rice and glutinous rice flour to bulk up the starter to the right amount to bake a loaf, but you can use whatever you’ve been feeding your starter, or even the same Well & Good Crusty Bread mix to keep it simple (if you have extra).

Ingredients – Day 1

  • 60g of sourdough starter (from the fridge)
  • 45mL (at least) water
  • 45g flour (half-half brown rice flour and glutinous rice flour)

Method – Day 1

  1. Get the sourdough starter out of the fridge at the start of the day, and leave somewhere warm like the kitchen. Wait a few hours until it has warmed up and is looking bubbly.
  2. Follow the process previously described in the sourdough starter post under the feeding regime, but instead of discarding the remaining starter into the discard jar that’s kept in the fridge, put it in its own small container.
  3. Follow the feeding regime for the starter that is in this small container, but scaled appropriately to the amount that is in there. Assuming 25g of starter has gone into the small container, add 25g of water and 25g of flour. There should be no left over starter to go into the discard jar. You will now have both the starter jar and the small container with similar amounts of sourdough starter in it.
  4. Wait a few hours for the starter in the starter jar to have very tiny bubbles, and put it back into the fridge. However, do not put the small container into the fridge – leave it out on the bench or wherever you had it before. It doesn’t matter if it gets cold overnight.

Ingredients – Day 2

  • 70g of starter from Day 1
  • 70mL (at least) water
  • 70g flour (half-half brown rice flour and glutinous rice flour)

Method – Day 2

  1. About 24 hours after the starter was put into the small container (perhaps around midday), it should look bubbly and is ready to do the feeding regime again, which will triple its weight. Scrape the starter into a medium container, and weigh it.
  2. Follow the feeding regime again for the starter that is in this container, but scaled appropriately to the amount that is in there. Assuming 70g of starter has gone into the medium container, add 70g of water and 70g of flour. Again, there is no discard.
  3. Leave the medium container out on the kitchen bench or somewhere warm.

Ingredients – Day 3

  • 200g of starter from Day 2
  • 300mL water
  • 400g Well & Good Crusty Bread mix (or equivalent speciality bread flour)
  • 20mL olive oil
  • 5g table salt
  • fine rice flour for dusting

Method – Day 3

  1. About 24 hours after the starter was put into the medium container (perhaps around midday), it should look bubbly and is ready. Prepare a banneton, or proofing basket, by dusting with fine rice flour and knocking it around to ensure it is even. If you don’t have a banneton, you can use a ricotta basket or even a plastic colander (if the holes are big, you can also put a cotton tea towel in it first).
  2. Scrape it into a mixing bowl, along with all the other ingredients, and mix with a dough hook. You can also use a spoon and/or your hands, but that will be a bit messier. Unlike with a gluten-based dough, you don’t need to mix and pound it for ages. After 2 or 3 minutes, it should have been combined together sufficiently.
  3. Put a small amount of oil on your hands to prevent the dough sticking, and pull the dough out with your hands, shaping it into a ball. If it is really sticky and the surface is rough, that’s not a problem.
  4. Push the dough ball into the banneton so it is flattened against the bottom. Protect the dough from drying out by spraying oil onto some cling film that is stretched over the top of the banneton, or just put the whole banneton in a plastic freezer bag.
  5. Leave the banneton out on the kitchen bench or somewhere warm.

Ingredients – Day 4

  • Dough from Day 3

Method – Day 4

  1. About 24 hours after the dough was left to rise, it should have doubled in size. You can let it go longer (say 36 hours) if the room has been a bit cold overall and it needs it to achieve the doubling. It is now ready to bake!
  2. Set oven to 220 degrees Celcius, and place a cast iron dutch oven in there with the lid on, to warm up. Leave it at least 30 mins from when the oven is at temperature so that the dutch oven is definitely hot. I use a 4.7L dutch oven, which works well, but you can go bigger. If you don’t have a dutch oven, you can apparently use a pizza stone together with a foil cover. However, using a dutch oven or a bessemer pot is the recommended way to go, as it provides heat while retaining moisture during the expansion phase of the baking.
  3. Remove the plastic (cling film or freezer bag) cover from the banneton. Get a large piece of baking paper ready, and place this on top of the dough. Gently invert the banneton so the dough comes out of the banneton and is resting on the baking paper.
  4. With a sharp knife, slice (score) a pattern on the top of the dough. Unlike with gluten-based bread, you don’t need a special razor blade – a kitchen knife will do. Cut into the top of the dough about 1 cm as you go. You can choose from a variety of patterns. I like to either score a big X (as seen in the photos here) or score three parallel lines across the top. The chef in my sourdough class liked to do a tic-tac-toe board style pattern. Do a web search for “scoring patterns” if you want inspiration.
  5. Moving quickly, take the dutch oven out of the oven, and remove the lid. Gently lower the baking paper with the dough on top into the dutch oven, but remember the dutch oven is really hot. Replace the dutch oven’s lid and return to the oven. Reduce the temperature to 200 degrees Celcius. Bake for 20-25 mins.
  6. Take the dutch oven out of the oven, and remove the lid. Return it to the oven without the lid. Bake for another 20-25 mins.
  7. Take the dutch oven out, and let it stand for 10 mins or so before removing the bread and letting cool completely on a cooling rack. This takes a couple of hours.
  8. Often by this point it is the evening of the fourth day, so I’m not ready to eat the bread straight away. It will be breakfast on the morning of the fifth day! I like to put my bread in a paper bag, and then in a sealed plastic bag to keep it fresh.
  9. Enjoy!

Gluten-Free Sourdough Waffles

I previously described how I maintain my sourdough starter at 60g in the fridge, feeding it weekly. Since sourdough can basically triple itself in 24 hrs (or in a week in my case, since I keep it in the fridge), I need to discard 2/3rd of it each time so it maintains the same size. I also keep the discard in the fridge, in a separate jar, and it builds up at a rate of about 30g per week (with another 10g lost down the sink). What do I do with this? A popular option is to turn it into waffles!

I received a Breville “the No Mess Waffle” maker appliance as a present a few years back, before I went gluten-free, and made lots of different types of waffles. I can confidently say that this recipe makes the best plain waffle that I’ve had from the waffle maker. It has a good crispy texture and a great taste that works as a vehicle for a range of sweet toppings.

My discard jar holds about 180g of discard, so it takes around 6 weeks to fill up and that’s probably about as frequent as we’d want to make waffles. The recipe below is heavily based on this sourdough waffle recipe from Cultures for Health. Note – it does need to be started the evening before, for cooking into waffles for breakfast the following morning.

Ingredients

  • 180g of discarded sourdough starter, from the fridge
  • 140mL of water (no warmer than lukewarm)
  • 90g white rice flour
  • 45g sticky rice flour (a.k.a. glutinous rice flour or sweet rice flour)
  • 45g cornflour
  • 1/4 teaspoon (heaped) baking powder
  • 1/2 teaspoon table salt
  • 1 tablespoon (20mL) maple syrup
  • 2 teaspoons (10mL) vanilla extract
  • 2 eggs
  • 30g unsalted butter, melted
  • 1/2 teaspoon bicarb soda
  • 1 teaspoon (5mL) water – optional

Method

  1. In a sealable bowl or container, mix the discard with the water, then mix in the flours. Seal and leave on the bench overnight.
  2. In the morning, when the discard has reactivated and turned the flour mixture bubbly, put the mixture in a large bowl, and add in the remaining ingredients (excepting the bicarb soda). Stir with a fork until there are no big lumps.
  3. If the bicarb soda is very powdery, it can be evenly sprinkled over the top. If it’s a bit lumpy, dissolve it in a teaspoon of water, then tip into the mixture. Quickly stir through and leave until ready to start cooking.
  4. Set the waffle maker to 5 (or desired crispness/brownness), and when ready, pour 1/2 cup (125mL) of mixture evenly across the cooking surface. Keep cooking each waffle this way until done.

Makes 6 waffles. Serve with maple syrup, sliced fruit, berries, cream/yoghurt, or however you like them!

Surplus waffles can be frozen, separated with baking paper. They reheat well split in half and popped in the toaster!

Gluten-Free Sourdough

I was late to lockdown-driven sourdough baking. It wasn’t until Melbourne’s second lockdown, in August 2020, that I finally got on the sourdough bandwagon. However, I have kept my sourdough starter alive since then, so I’ve achieved the ten-month milestone!

Still, if I was to share my starter with someone else, or, not that I want to think about it, fell sick and someone else needed to keep it going, my sourdough regime isn’t documented anywhere yet. This post is intended to record what I’ve been doing, and it’s a little bit different to other sourdough feeding approaches that I’ve read online.

It’s not radical or anything. It just suits me and my needs in two ways. Firstly, the sourdough starter is gluten-free. Secondly, it is pretty cheap given that it gets minimal feeding – only 20g of flour each week – unless I’m baking something.

Before I describe it, I’d like to credit my main inspirations for the technique I use:

Feeding Regime

I keep my sourdough starter in the fridge, and then one morning on the weekend, I remove it and allow it to warm up. This allows the starter to get active again, and after a few hours, it will be creating bubbles.

a jar with sourdough starter and in the background is a bag of brown rice flour and a bag of glutinous rice flour

As you can see here, I keep my sourdough starter in a small glass jar, and mark the fill level with a rubber band, in traditional style. In this picture, it has risen a little and looks bubbly. Note that this is basically as bubbly as it gets, unlike many pictures of other sourdough starters that you see online. However, it still seems to work perfectly fine for baking.

An empty glass jar on a scales with sourdough starter in a nearby glass

The first thing I do is open the glass jar and smell it. It should smell sweet and yeasty, but if it doesn’t, I throw it out and use some of my earlier discard (see below), but I’ve had to do that only once. Next, I stir it with a fork, and scrape out the glass jar into a drinking glass that is good for pouring. I then give the glass jar a good rinse and put it on the kitchen scales. The scales need to be pretty accurate, and the ones I have are accurate to about 1 gram.

21 grams of sourdough starter measured into the glass jar with the remaining starter in a nearby glass and another glass container nearby with discard

I measure 20 grams (or close to it) of starter back into the glass jar, and scrape the rest of it into another jar that I use to keep the discard. The discard jar holds up to about 180 grams, which is a good amount for some of the recipes that I use. The discard jar is always stored in the fridge.

23 grams of water measured into the glass jar with the remaining water in a glass nearby

I now rinse out the drinking glass and partially fill it with lukewarm water from the tap. In Melbourne, the tap water is completely fine for sourdough. I pour about 20 grams (or a little more) of water into the glass jar, on top of the 20 grams of sourdough starter from before. Don’t tip out the rest of the water yet, though.

20 grams of flour measured into the glass jar with the bags of flour in the background

I now measure 20 grams of flour, which is equal parts brown rice flour and glutinous rice flour (also known as sticky rice flour or sweet rice flour). The glutinous rice flour is cheap and readily found at the supermarket. The brown rice flour is an organic brand, which helps ensure appropriate micro-organisms are being introduced.

A dry, lumpy mixture in a glass jar with a fork in it

I mix it all together with a fork, and at this point, it may be too dry. If so, I spoon in a very small amount of additional water, until I can mix it into a smooth, thick paste.

A thick and smooth mixture in a glass jar

The result should be something like thickshake consistency, but it doesn’t hurt the sourdough if it’s a bit runnier. The weights given above are for a “100% hydration” sourdough starter, which is what most sourdough recipes assume, so if the starter is runny, you’ll need to deal with that when baking. However, if you’re not baking, you can just be more careful at the next feed, and the ratio should come right.

I leave the starter in its glass jar for a few hours until very tiny bubbles are just visible, and then I pop it back in the fridge for another week.

The way I’ve described this above, it probably sounds very finicky. In practice, it takes about 5 minutes of work per week, with the rest of the time spent simply leaving a glass jar on the kitchen bench or in the fridge. All up, it’s not much effort to maintain the sourdough starter so it can be used to bake amazing things.

Baking approach

If I’m going to do some sourdough baking, there are two things to address. Firstly, sourdough that is straight from the fridge needs some time to become properly active. Secondly, most recipes seem to assume there is 150 grams of starter available. These can both be dealt with together, but it does take a couple of days.

To get up to 150 grams, I remove the starter from the fridge and follow an approach similar to a normal feed as described, but with an intent to bulk up the starter rather than maintain the size of the starter. The glass jar won’t hold 150 grams of starter, so to bulk up the starter, I need to scrape it out into a bigger container. There is about 60 grams of starter in the glass jar, but in practice, about 50 grams can be scraped out.

So, you can do 50 grams starter + 50 grams water + 50 grams flour to get to the required 150 grams. However, this doesn’t leave any starter to continue with. In theory, you can use previous discard if there’s some, but I would do this as a last resort.

Instead, I put 20 grams starter back into the glass jar and feed it as usual (and put it back into the fridge), and put 30 grams into a new container, with 30 grams water + 30 grams flour, which gets to about 90 grams. I leave this for a full day, then discard 40 grams, and add 50 grams water + 50 grams flour, to get to 150 grams. It should be fine to bake with the next day, as it will be active and the right size.

If you’ve read through all of this and want to follow this approach yourself for gluten-free sourdough starter, I hope it was clear. Please let me know how you go!