 I’ve been on Facebook for almost six years now, and active for almost five. This is a long time in Internet time.
Facebook has, captured within it, the majority of my interactions with my friends. Many of them have stopped blogging and just share via Facebook, now. (Although, at least two have started blogging actively in the last year or so, and perhaps all is not lost.) At the start, I wasn’t completely convinced it would still be around – these things tended to grow and then fade within just a few years. So, I wasn’t too concerned about all the *stuff* that Facebook would accumulate and control. I don’t expect them to do anything nefarious with it, but I don’t expect them to look after it, either.
However, I’ve had a slowly building sense that I should do something about it. What if Facebook glitched, and accidentally deleted everything? There’s nothing essential in there, but there are plenty of memories I’d like to preserve. I really wanted my own backup of my interactions with my friends, in the same way I have my own copies of emails that I’ve exchanged with people over the years. (Although, fewer people seem to email these days, and again they just share via Facebook.)
The trigger to finally do something about this was when every geek I knew seemed to have got themselves a Raspberry Pi. I tried to think of an excuse to get one myself, and didn’t have to think too hard. I could finally sort out this Facebook backup issue.
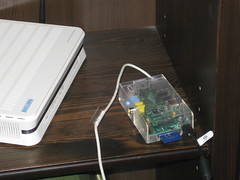
Part of the terms of my web host are that I can’t run any “robots” – it’s purely meant to handle incoming web requests. Also, none of the computers at home are on all the time, as we only have tablets, laptops and phones. I didn’t have a server that I could run backup software on.. but a Raspberry Pi could be that server.
For those who came in late, the Raspberry Pi is a tiny, single-board computer that came out last year, is designed and built in the UK, and (above all) is really, really cheap. I ordered mine from the local distributor, Element14, whose prices start at just under $30 for the Model A. To make it work, you need to at least provide a micro-USB power supply ($5 if you just want to plug it into your car, but more like $20 if you want to plug it into the wall) and a Micro SD card ($5-$10) to provide the disk, so it’s close to $60, unless you already have those to hand. You can get the Model B, which is about $12 more and gets you both more memory and an Ethernet port, which is what I did. You’ll need to find an Ethernet cable as well, in that case ($4).
When a computer comes that cheap, you can afford to get one for projects that would otherwise be too expensive to justify. You can give them to kids to tinker with and there’s no huge financial loss if they brick them. Also, while cheap, they can do decent graphics through an HDMI port, and have been compared to a Microsoft Xbox. No wonder they managed to sell a million units in their first year. Really, I’m a bit slow on the uptake with the Raspberry Pi, but I got there in the end.
While you can run other operating systems onto it, if you get a pre-configured SD card, it comes with a form of Linux called Raspbian and has a programming language called Python set up ready to go. Hence, I figured as well as getting my Facebook backup going, I could use this as an excuse to teach myself Python. I’d looked at it briefly a few years back, but this would be the first time I’d used it in anger. I’ll document here the steps I went through to implement my project, in case anyone else wants to do something similar or just wants to learn from this (if only to learn how simple it is).
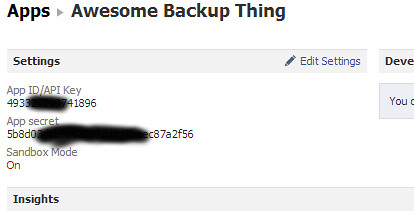
The first thing to do is to head over to developers.facebook.com and create a new “App” that will have the permissions that I’ll use to read my Facebook feed. Once I logged in, I chose “Apps” from the toolbar at the top and clicked on “Create New App”. I gave my app a cool name (like “Awesome Backup Thing”) and clicked on “Continue”, passed the security check to keep out robots, and the app was created. The App ID and App secret are important and should be recorded somewhere for later.
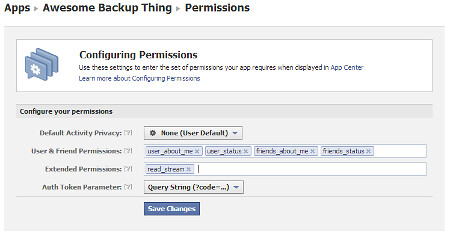
Now I just needed to give it the right permissions. Under the Settings menu, I clicked on “Permissions”, then added in the ones needed into the relevant fields. For what I want, I needed: user_about_me, user_status, friends_about_me, friends_status, and read_stream. “Save Changes” and this step is done. Actually, I’m not sure if this is technically needed, given the next step.
Now I needed to get a token that can be used by the software on the server to query Facebook from time to time. The easiest way is to go to the Graph API Explorer, accessible under the “Tools” menu in the toolbar.
I changed the Application specified in the top right corner to Awesome Backup Thing (insert your name here), then clicked on “Get access token”. Now I need to specify the same permissions as before, across the three tabs of User Data Permissions (user_about_me, user_status), Friends Data Permissions (friends_about_me, friends_status) and Extended Permissions (read_stream). Lastly, I clicked on “Get Access Token”, clicked “OK” to the Facebook confirmation page that appeared, and returned to the Graph API explorer where there was a new token waiting for me in the “Access token” textbox. It’ll be needed later, but it’s valid for about two hours. If you need to generate another one, just click “Get access token” again.
Now it’s time to return to the Pi. Once I logged in, I needed to set up some additional Python packages like this:
$ sudo pip install facepy
$ sudo pip install python-dateutil
$ sudo pip install python-crontab
And then I was ready to write some code. The first thing was to write the code that will keep my access token valid. The one that Facebook provides via the Graph API Explorer expires too quickly and can’t be renewed, so it needs to be turned into a renewable access token with a longer life. This new token then needs to be recorded somewhere so that we can use it for the backing-up. Luckily, this is pretty easy to do with those Python packages. The code looks like this (you’ll need to put in the App ID, App Secret, and Access Token that Facebook gave you):
# Write a long-lived Facebook token to a file and setup cron job to maintain it
import facepy
from crontab import CronTab
import datetime

APP_ID = '1234567890' # Replace with yours
APP_SECRET = 'abcdef123456' # Replace with yours

try:
  with open("fbtoken.txt", "r") as f:
  old_token = f.read()
except IOError:
  old_token = ''
if '' == old_token:
  # Need to get old_token from https://developers.facebook.com/tools/explorer/
  old_token = 'FooBarBaz' # Replace with yours

new_token, expires_on = facepy.utils.get_extended_access_token(old_token, APP_ID, APP_SECRET)

with open("fbtoken.txt", "w") as f:
  f.write(new_token)

cron = CronTab() # get crontab for the current user
for oldjob in cron.find_comment("fbtokenrenew"):
  cron.remove(oldjob)
job = cron.new(command="python ~/setupfbtoken.py", comment="fbtokenrenew")
renew_date = expires_on - datetime.timedelta(1)
job.minute.on(0)
job.hour.on(1) # 1:00am
job.dom.on(renew_date.day)
job.month.on(renew_date.month) # on the day before it's meant to expire
cron.write()
Apologies for the pretty rudimentary Python coding, but it was my first program. The only other things to explain are that the program sits in the home directory as the file “setupfbtoken.py” and when it runs, it writes the long-lived token to “fbtoken.txt” then sets up a cron-job to refresh the token before it expires, by running itself again.
I’ll finish off the rest of the code in the next post.
> sets up a cron-job to refresh the token
> before it expires, by running itself again
Sadly, I’ve discovered that this doesn’t work. A server cannot renew a long-lived access token based on a previous long-lived access token. Facebook wants an actual user to log back into the site before tokens can be refreshed.