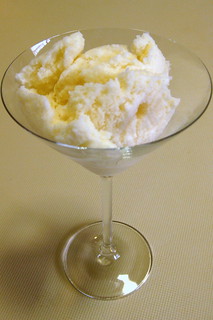
 My first memories of Coconut Ice are from my primary school years, where one of our school holiday babysitters made it one day. Despite the childhood associations and, of course the fact it contains sugar, I was never particularly fond of this confection as it contains that most dreaded of ingredients – copha. The fatty residue that copha leaves on my tongue renders any otherwise tasty treat sadly into a nasty treat.
However, in digging around for recipes for the upcoming Carribean dinner at our recipe club, I’ve come across a recipe for Coconut Ice that doesn’t contain copha, and actually matches the description on the tin – it is a frozen coconut dessert. That said, it does taste a lot like the other Coconut Ice so it has the added bonus of having childhood associations, too, just without the copha.
I’ve made this twice now, and it is quick and straightforward. The icing on the cake is that it doesn’t require an icecream maker, so I can theoretically decide to make it in a morning and then eat it in the evening, which will be great coming into summer!
The original recipe is from the Island Flave website.
Ingredients
- 200g dessicated coconut
- 200mL warm water
- 1 cup caster sugar
- pinch of cream of tatar
- 2 cups (500mL) full cream milk
- almond essence
- 1 egg (but really we just want the yolk)
Method
- Mix the coconut with the water in a small bowl to rehydrate it. Pack it down and then cover with cling film. Set it aside for at least 10mins.
- When coconut is rehydrated, separate it using a fork, then scoop out 1 cup (250mL) of the coconut and place it in a large mixing bowl with the sugar and cream of tatar.
- Put the remaining coconut into a fine sieve, pack it down, and place the sieve over the mixing bowl.
- Heat the milk in a saucepan, without stirring, until the milk is about to boil.
- While the milk is heating, separate the yolk from an egg, and place in a small container. Beat the yolk until it is runny.
- When the milk is ready, remove from the heat, remove any film from the top, then gently pour it through the sieve. Press down on the coconut with the back of a spoon to squeeze all the milk through. Discard the coconut from the sieve as it is now pretty tasteless.
- Stir the mixture until the sugar is dissolved. Mix in the egg yolk and a few drops of almond essence (no more than 1/4 teaspoon or it will taste very almondy).
- Pour the mix into a 1L container and place in the freezer for a few hours or overnight.
- While in the freezer, the mix will separate and the top will go hard. So, at least a couple of hours before serving, remove the mix from the container, break into chunks, and blend well with a stick mixer or blender, before returning to the freezer.
